When paying vendors, it’s important to send a remittance advice email so they know when and how the payment was made. Microsoft Dynamics 365 Business Central lets you customize email body for vendor remittance advice, making your communication more professional, efficient, and consistent.
By setting up a default vendor remittance advice email body template, you can automate the process, saving time while ensuring your emails always look polished. In this guide, we’ll walk you through the steps to customize the remittance email body using the Payment Journal in Business Central.
Table of Contents
Why Customize Vendor Remittance Advice Email Body?
If you’re manually editing every remittance email before sending it, you’re wasting time. Setting up a custom vendor remittance advice email body in Business Central offers multiple benefits:
✅ Saves time – No need to manually edit emails every time.
✅ Ensures consistency – Every email follows a professional format.
✅ Improves communication – Vendors get clear and structured payment details.
✅ Reduces errors – Eliminates the risk of sending incomplete or incorrect details.
Step-by-Step Guide to Customizing Remittance Advice Emails Body
Now, let’s dive into the step-by-step process to set this up.
First of all, you need to setup Email Accounts or Configurations, to enable sending remittance advice email to vendors. The email body of vendor remittance advice in Business central can be modified so that a default message automatically appears every time you send vendor remittance advice. This Will help Streamline your business and save time when sending remittance advice to vendors in D365 business central.
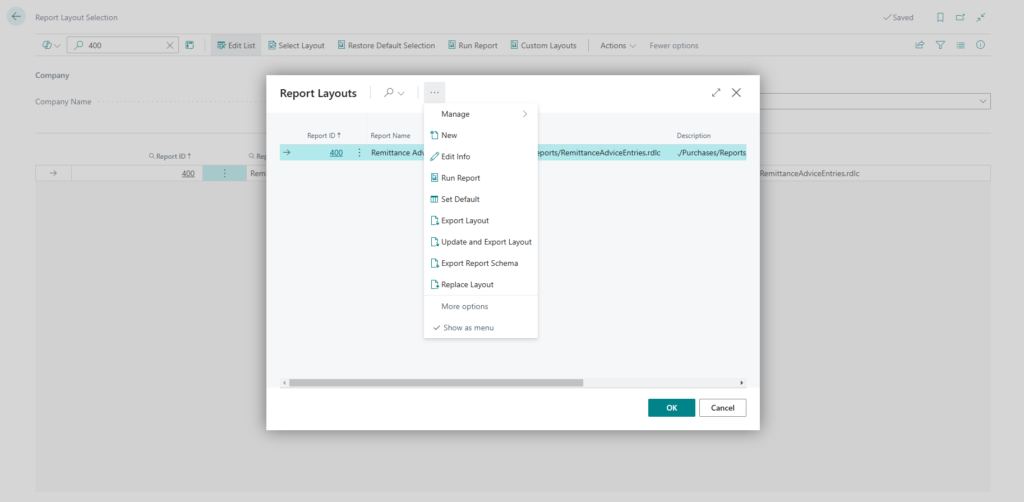
Step 1: Select the Report Layout
To start, we need to export the XML Schema of the remittance advice report so we can use it in a custom Word template.
- In Business Central, search for “Report Layout Selection”.
- Find Report ID 400 (Remittance Advice).
- Click the three dots (•••) and select Export Report Schema.
This XML Schema will help us structure the email template in the next step.
Step 2: Create a Custom Word Template for the Email Body
Now, we’ll create the email body format for vendor remittance using Microsoft Word.
- Open Microsoft Word and enable Developer Mode (if not already enabled).
- Import the XML Schema exported in Step 1.
- Design the email content layout, adding placeholders for payment details.
- Save this document as a Word template.
This template will serve as the default email body when sending remittance advice.

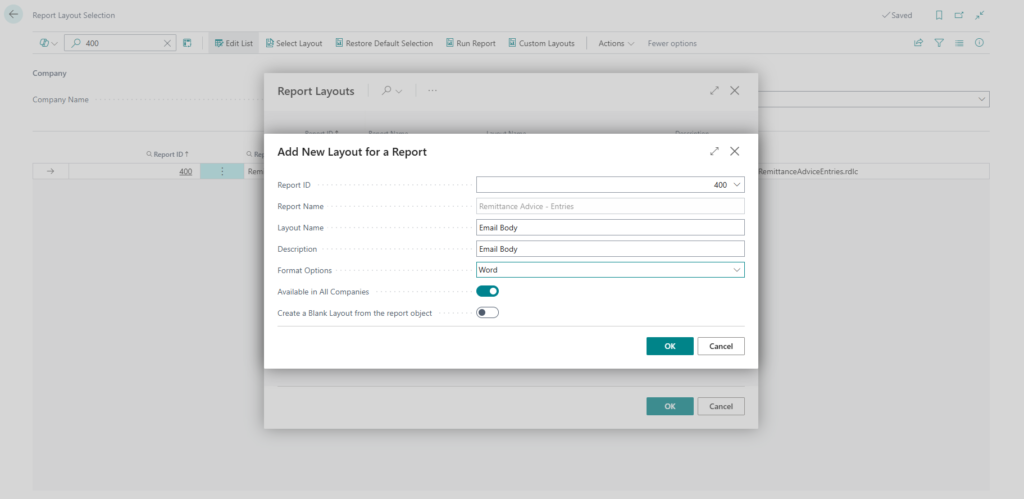
Step 3: Assign the Word Template to Report Layout
Once the template is ready, we need to set it as the default format in Business Central.
- Search for “Report Selection Layout” in Business Central.
- Locate Report ID 400 (Remittance Advice).
- Click Add New Layout, upload the Word template, and save.
This step ensures that every time a remittance advice is sent, it follows the customized email format you created.
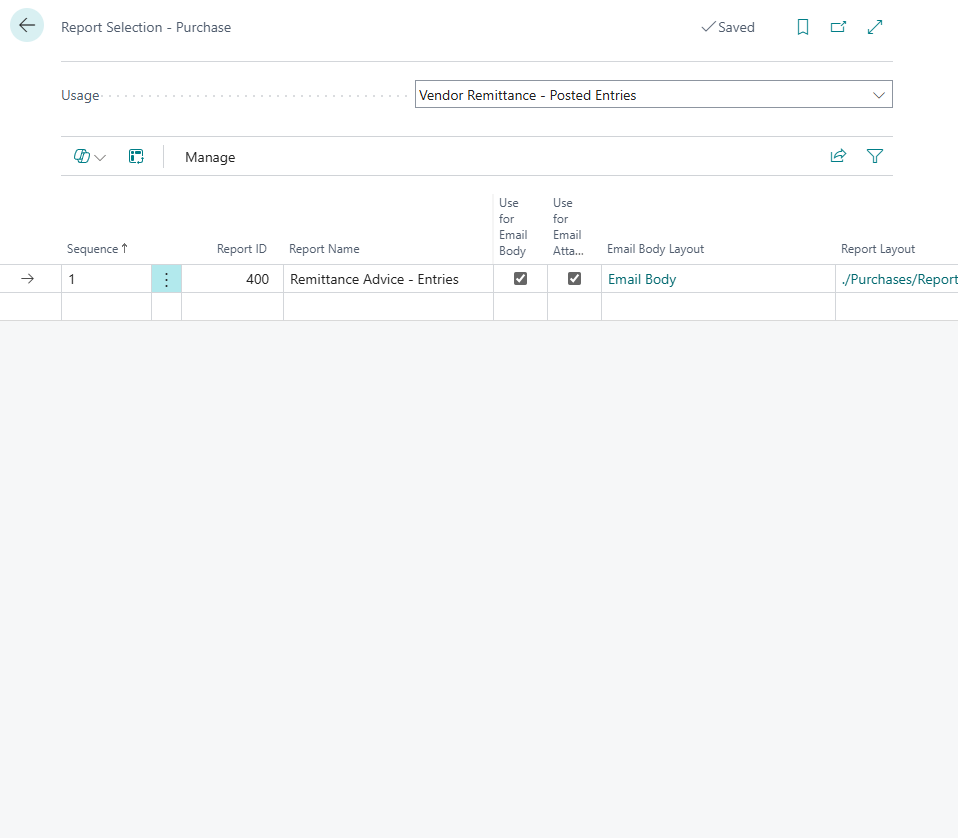
Step 4: Configure Report Selection for Vendor Remittance Email Body
To finalize the setup, we need to make sure Business Central uses this custom body template when sending vendor remittance emails.
- Search for “Report Selection Purchase”.
- Open the settings for “Vendor Remittance”.
- Make the following changes:
- ✅ Enable "Use for Email Body" – This ensures the email uses your custom format.
- ✅ Select the Email Body Layout – Choose the custom Word template you created.
- ✅ Set Report Layout – Specify the report layout path for consistency.
This setup ensures every vendor remittance email is properly formatted and follows your branding.
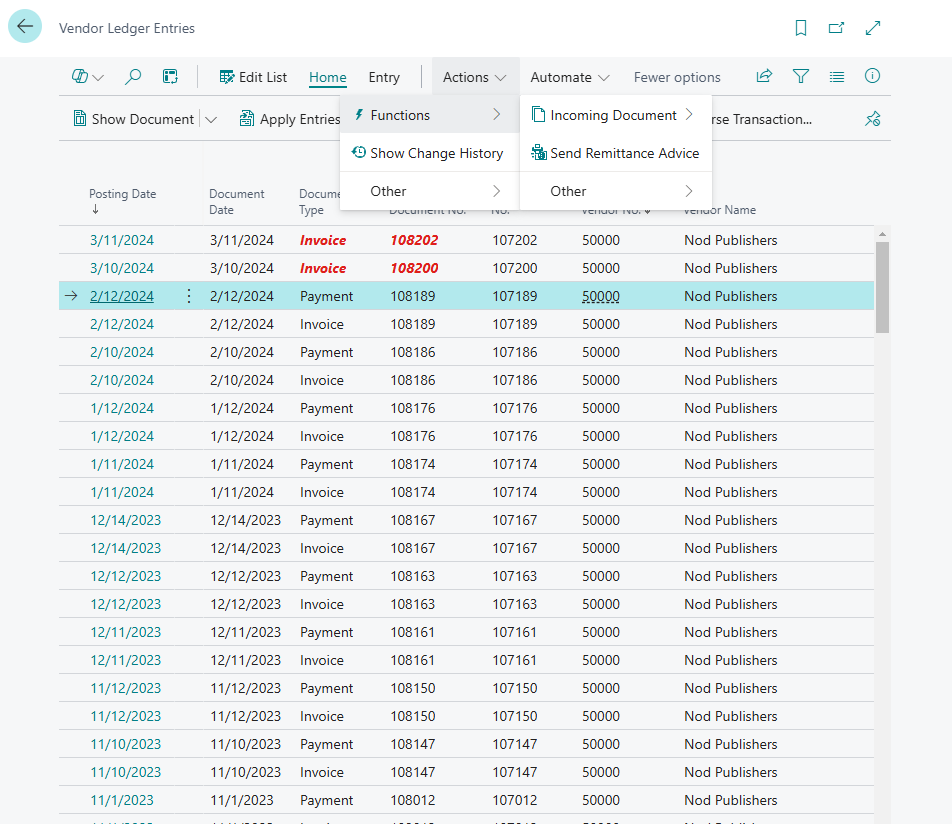
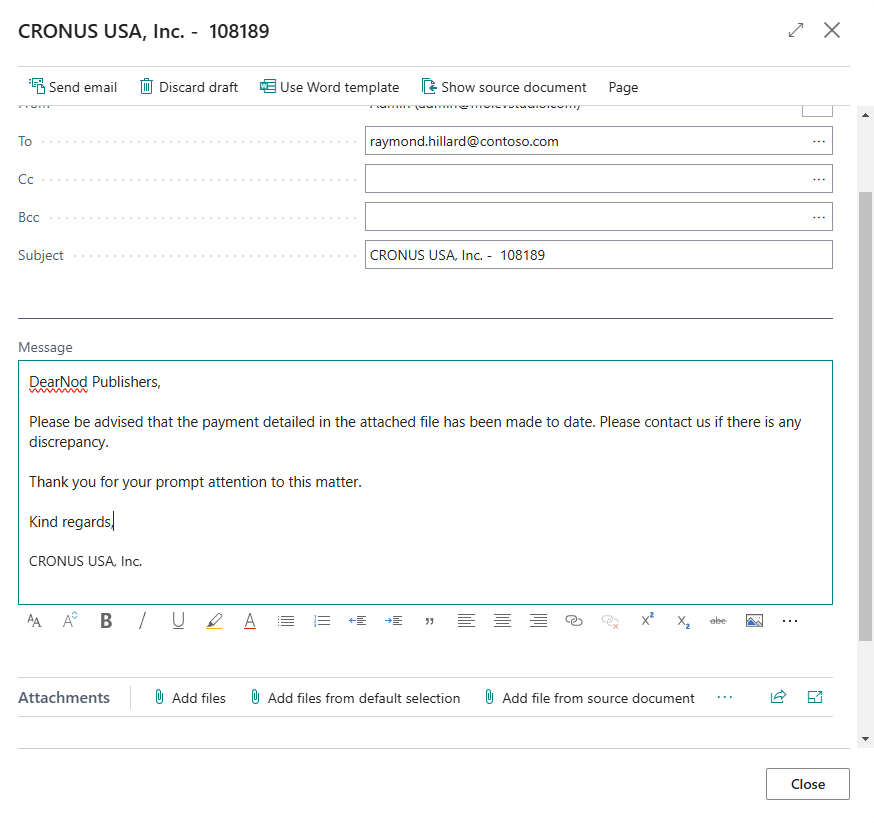
Step 5: Test the Setup with Vendor Ledger Entries
Now that everything is configured, it’s time to test it.
- Search for “Vendor Ledger Entries” in Business Central.
- Select a vendor with recorded payments.
- Click Send Remittance Advice and check the email preview.
If everything was set up correctly, the email body should automatically display the message from your custom Word template.
Step 6: Review the Final Output
After sending the remittance advice, double-check that:
✅ The email body contains the customized message.
✅ The formatting is correct and professional.
✅ The payment details are clear and structured.
✅ The email includes any necessary attachments.
Once you confirm the email looks good, you’re all set!
For more information on how to edit the layouts for remittance advice or the email body in Dynamics 365 Business Central, please reach out to us.
Final Thoughts and Frequently Asked Questions (FAQs)
Customizing remittance advice emails in Microsoft Dynamics 365 Business Central is a game-changer for businesses looking to streamline financial communication. By setting up a custom email template, you ensure that every email sent to vendors is consistent, professional, and informative—without requiring manual edits.
With just a one-time setup, your finance team can save time, reduce errors, and improve vendor relationships by providing clear and structured payment details. Whether you're managing a few vendors or handling bulk payments, this customization will make your remittance process smoother and more efficient.
If you need expert guidance on Business Central customization, automation, or ERP consulting, reach out to us today!
Can I use my company branding in the remittance advice email?
Yes! When creating a custom Word template, you can:
✅ Add your company logo.
✅ Use custom fonts and colors to match your brand.
✅ Include your company’s contact details and website.
How do I make the remittance email body dynamic (e.g., include vendor name or payment details)?
To insert dynamic fields:
✅ Use the XML Schema exported from Business Central.
✅ In your Word template, map placeholders to XML fields like: Vendor Name, Invoice Number, Payment Date, Amount Paid.
✅ Save and upload the template in Report Layout Selection.
Can I have different email body formats for different vendors?
Yes, you can create multiple templates by:
✅ Designing separate Word templates for each vendor type.
✅ Assigning different templates in Report Selection - Purchase.
✅ Using conditions in Power Automate to send emails with specific layouts.
How do I preview the email body before sending remittance advice?
To test the email format:
✅ Go to Vendor Ledger Entries.
✅ Select a vendor with payments recorded.
✅ Click Send Remittance Advice and check the email preview.
✅ If adjustments are needed, modify the Word template and re-upload.
Can I format the email body with HTML for better design?
Yes! Business Central supports HTML-formatted emails:
✅ Use a custom Word template with styled text, tables, and images.
✅ Ensure “Use for Email Body” is enabled in Report Selection - Purchase.
✅ Test by sending a sample email to confirm formatting.
How do I include a payment summary in the email body instead of an attachment?
If you want the payment details inside the email instead of an attachment:
✅ Modify the Word template to include all key payment details.
✅ Ensure “Use for Email Body” is checked in Report Selection - Purchase.
✅ Remove unnecessary attachments in the email settings.
Why is my customized remittance email body not appearing?
If your custom email body is not showing:
✅ Verify that the correct Word template is assigned in Report Selection - Purchase.
✅ Ensure “Use for Email Body” is enabled.
✅ Check if the Report Layout Selection has been updated with your custom template.
✅ Refresh Business Central or restart the service if changes are not applying.
