Effective warehouse management is the backbone of any successful supply chain, yet many businesses grapple with common challenges like inaccurate inventory, inefficient picking processes, and disjointed operational workflows. Microsoft Dynamics 365 Business Central offers a powerful and integrated solution to conquer these hurdles. It's not just a piece of software; it's a scalable framework designed to manage all aspects of your warehouse operations, from the moment goods arrive to the second they ship out the door.
Key warehouse features include fields like Require Receipt, Require Put-away, Require Pick, and Require Shipment for basic processes, and specialized fields for internal operations (production, assembly, jobs). Microsoft Dynamics 365 Business Central’s 2023 Wave 2 update introduces powerful new warehouse management settings, giving you finer control over warehouse workflows.
This definitive guide will walk you through the entire landscape of Dynamics 365 Business Central warehouse management, covering every aspect of warehouse handling from basic to advanced. We will start with the most critical strategic decision—choosing the right complexity level for your operations. From there, we will dive deep into configuring the Location Card, managing inbound, outbound, and internal flows, mastering advanced features like Directed Put-away and Pick, and finally, equipping you with best practices and troubleshooting solutions for common errors.
Table of Contents
The First Critical Decision: Choosing Your Warehouse Complexity Level
Before you enable a single feature in Business Central, the most important step is to make a strategic choice about the level of warehousing complexity your business truly needs. The various toggles and settings are simply tools to execute a predefined operational strategy. Selecting the wrong level can introduce unnecessary overhead or, conversely, fail to provide the control you need, leading to significant operational friction. Business Central offers a spectrum of complexity, which can be grouped into three main levels.
Level 1: Basic Inventory (No Bins, No Warehouse Documents)
This is the simplest configuration, where a location acts as a single, undifferentiated container for your inventory.
- Description: This setup relies exclusively on Item Ledger Entries to track quantity. There are no dedicated warehouse activities or documents. While you can use the Shelf No. field on an item card for purely informational purposes, the system does not use this data to direct any warehouse activities or calculate availability. All receiving and shipping transactions are posted directly from the source documents, such as a Purchase Order or Sales Order.
- Use Case: This level is ideal for very small businesses, retail store backrooms, or service vans where the primary need is to know the total quantity of an item in a single, defined place.
- Limitations: This approach offers no visibility into where items are physically stored within the location (no bin tracking). It also provides no separation of duties between administrative staff (who create orders) and warehouse staff (who handle the goods).
Level 2: Basic Warehousing (Order-by-Order with Bins)
This level introduces true bin-level tracking and dedicated, but simplified, warehouse documents.
- Description: This configuration is the first step into formal warehousing. It is enabled by toggles like Require Pick and Require Put-away on the Location Card. Crucially, for this level to be effective, the Bin Mandatory toggle must be enabled, which enforces bin selection on all transactions. This setup uses Inventory Put-away and Inventory Pick documents, which are created on a one-to-one basis from their source documents (e.g., one purchase order creates one inventory put-away). This model simplifies workflows by collapsing the receipt and put-away steps into a single action, and the pick and shipment steps into another.
- Use Case: This is a perfect fit for small to medium-sized warehouses that require accurate bin-level inventory tracking to improve picking efficiency but do not have the operational volume or complexity to justify separate receipt and shipment stages.
- Limitations: Because processes are handled on an order-by-order basis, you cannot consolidate multiple orders into a single pick or shipment document.
Level 3: Advanced Warehousing (WMS with Directed Put-away & Pick)
This is the most comprehensive and complex configuration, designed for high-volume, sophisticated warehouse operations.
- Description: Often referred to as WMS (Warehouse Management System), this level is activated by enabling the Directed Put-away and Pick toggle on the Location Card. It utilizes a full suite of warehouse documents— Warehouse Receipt, Warehouse Put-away, Warehouse Shipment, and Warehouse Pick—which effectively decouples the physical warehouse operations from the back-office financial postings. For example, a warehouse receipt can be posted to acknowledge goods have arrived, but the purchase order invoice cannot be paid until the put-away is also completed and the goods are in their final storage bin.
- Use Case: This configuration is essential for large distribution centers, third-party logistics (3PL) providers, and complex manufacturing environments. It enables advanced strategies like wave picking, cross-docking, automated replenishment, and system-guided activities.
- Limitations: This level introduces significant procedural overhead and requires a well-organized physical warehouse and disciplined user adherence to processes.
To help clarify this crucial decision, the following table compares the key aspects of Basic and Advanced Warehousing.
| Feature | Basic Warehousing (Order-by-Order) | Advanced Warehousing (WMS) |
|---|---|---|
| Primary Documents | Inventory Pick, Inventory Put-away | Warehouse Pick, Warehouse Shipment, Warehouse Receipt, Warehouse Put-away |
| Process Flow | One-to-one relationship with source document (e.g., 1 Sales Order -> 1 Inventory Pick) | Decoupled from source documents; allows for consolidation (e.g., multiple Sales Orders -> 1 Warehouse Shipment) |
| Key Enabler | Require Pick & Require Put-away toggles | Directed Put-away and Pick toggle |
| Bin Management | Basic bin content tracking; requires Bin Mandatory | Advanced features: Bin Types, Bin Ranking, Capacity Policies, Zones |
| Ideal For | Small to medium warehouses needing bin-level accuracy without high complexity. | Large, high-volume, complex distribution centers and manufacturing facilities. |
| Core Benefit | Simplicity, speed, and direct process flow. | Granular control, process separation, scalability, and operational efficiency. |
| Data Captured | Item Ledger Entries | Item Ledger Entries and detailed Warehouse Entries for every movement |
The Command Center: A Deep Dive into the Warehouse Location Card
All warehouse configuration in Business Central begins on the Location Card. Think of it as the central control panel for a specific warehouse. To access it, navigate to Locations and select the location you wish to configure. The settings under the Warehouse FastTab dictate all material flows. Under the Warehouse FastTab, you’ll see options such as:
Essential Warehouse Toggles Explained
- Require Receipt / Require Shipment: These toggles introduce the first layer of process separation. When Require Receipt is enabled, posting a purchase order creates a Warehouse Receipt document instead of directly increasing inventory. Similarly, Require Shipment creates a Warehouse Shipment document from a sales order. This ensures that warehouse staff must physically process the receipt or shipment before the corresponding financial transaction (invoice) can be posted, creating a clear separation of duties.
- Require Put-away / Require Pick: These settings create the documents for internal warehouse movements. In a Basic Warehousing setup, they generate Inventory Put-away and Inventory Pick documents. In an Advanced Warehousing setup, they generate Warehouse Put-away and Warehouse Pick documents, which are part of a more complex, multi-step workflow.
- Bin Mandatory: This is arguably the most critical "gateway" toggle for any serious warehousing operation. When checked, it forces users to specify a bin code on every transaction line. While it adds a step to data entry, it enforces operational discipline and dramatically improves inventory accuracy by ensuring the system always knows the precise location of every item.
- Directed Put-away and Pick – If enabled, this advanced mode locks other handling options and enforces a strict bin-based workflow. With this on, Business Central automatically assigns internal processes to use warehouse picks (or no handling) as appropriate (see below).
- Other toggles – You can also set handling times, cross-docking, and ADCS (barcode scanning) options as needed on this card.
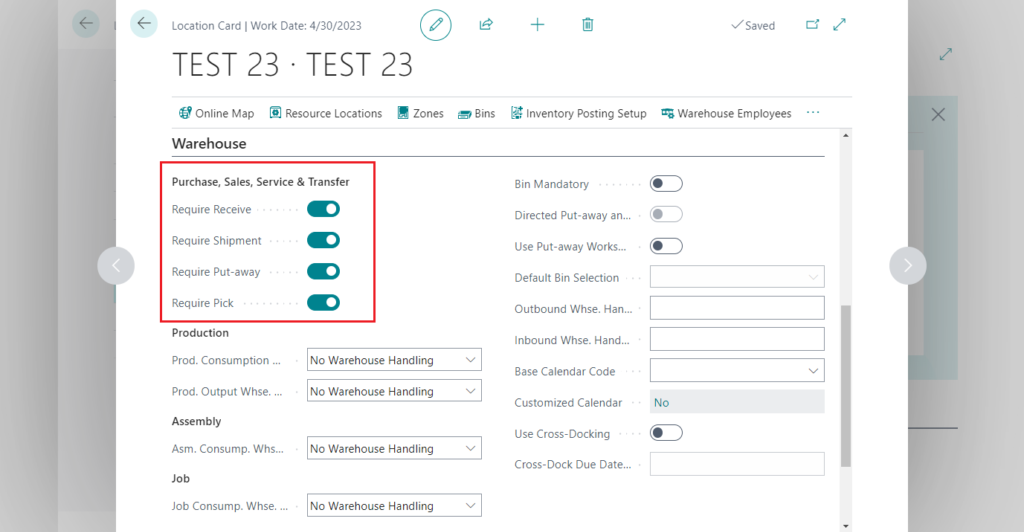
Best Practice: Use Bin Mandatory for warehouses with multiple storage bins to improve accuracy, and turn on Require Pick/Put-away when you want dedicated warehouse documents for receiving and shipping. If your warehouse is simpler, you can leave these off and use inventory receipts/shipments directly.
Configuring Whse. Handling Times for Accurate Planning
Beyond the main toggles, the Location Card allows for fine-tuning of scheduling through handling times. The Inbound Warehouse Handling Time is a crucial field that specifies the time required to process incoming goods after they arrive. By setting a realistic inbound warehouse handling time (e.g., '1D' for one day), you provide the system with the data it needs to calculate more accurate delivery and availability dates for planning purposes. Similarly, an Outbound Warehouse Handling Time can be set for shipping processes.
These settings are critical for accurate date calculation and planning, as they are factored into the order promising calculations for both purchase and sales lines.
- Inbound Warehouse Handling Time: This field represents the expected time it takes to process goods after they arrive at the warehouse dock until they are put away and available for use. For example, a value of '2D' (two days) tells the system to add two working days to the receipt date to calculate the planned availability date. This directly impacts the delivery date calculations on purchase orders, providing a more realistic timeline.
- Outbound Warehouse Handling Time: This field defines the time needed to pick, pack, and stage goods for shipment after they are allocated to an order. This value is used to calculate the planned shipment date on sales orders, ensuring you commit to realistic shipping schedules.
- Base Calendar: The handling time calculations are not based on calendar days but on the working days defined in the Base Calendar assigned to the location. This ensures that weekends and holidays are automatically excluded from the date calculations, leading to much more accurate and reliable planning dates across your supply chain.
Structuring Your Space: Setting Up Bins, Zones, and Layout
A well-structured warehouse layout in Business Central is essential for efficient operations.
- Bins: Bins are the smallest storage units in Business Central. You can create bins and assign them specific Bin Types (e.g., RECEIVE, SHIP, PICK, PUTAWAY, STORAGE) that define their role in the warehouse flow. For example, the system will direct inbound items to a RECEIVE bin and stage outbound items in a SHIP bin.
- Bin Content: You can further refine how bins are used by defining their content properties:
- Fixed: Assigns a specific item to a bin, ensuring that even when empty, the bin is reserved for that item.
- Dedicated: Reserves a bin for a specific resource, like a machine center on the production floor.
- Default: Specifies a preferred bin for an item, which the system will suggest for inbound and outbound flows in non-DPAP locations.
- Zones: In larger warehouses, you can group multiple bins into Zones. Zones are logical areas (e.g., "Bulk Storage," "Frozen Goods," "Picking Zone") that simplify setup and management. Properties like bin type or warehouse class can be set at the zone level and are automatically inherited by all bins created within that zone, saving significant configuration time.
Configuring Warehouse Flows: Inbound, Outbound, and Internal
With the Location Card configured, these settings come to life in your daily operational flows. Effective warehouse handling is divided into three core flows: inbound, outbound, and internal.
Managing Inbound Warehouse Handling (Purchasing & Receiving)
The configuration of your inbound warehouse handling process depends directly on the toggles you've enabled.
- Simple Flow (Basic Warehousing): When a purchase order is received at a location with
Require Put-awayenabled (but notRequire Receipt), you create an Inventory Put-away directly from the PO. Posting this single document both records the put-away movement and posts the purchase receipt. - Advanced Flow (WMS): For a location with
Require ReceiptandRequire Put-awayenabled, the process is two steps:- A Warehouse Receipt is created from the purchase order. Warehouse staff post this document to confirm the goods have physically arrived at the receiving dock.
- Posting the receipt automatically creates a Warehouse Put-away document, which instructs staff to move the items from the receiving bin to their final storage bin(s). The purchase order cannot be invoiced until both steps are complete.
Managing Outbound Flow (Sales & Shipping)
Finally, the Warehouse Shipment is posted, which relieves the inventory and updates the source sales orders.
- Simple Flow (Basic Warehousing): From a released sales order at a location with
Require Pickenabled, you create an Inventory Pick. Posting this document picks the items from their bins and simultaneously posts the sales shipment. - Advanced Flow (WMS): This is a multi-step process designed for control and consolidation:
- A Warehouse Shipment document is created. You can pull multiple released sales orders into a single shipment document.
- From the shipment, a Warehouse Pick is created, providing a consolidated list of items to be picked for all orders on the shipment.
- Warehouse staff register the pick, which confirms the items have been moved from their storage bins to the shipping area.
A Closer Look: Handling Internal Operations (Production, Assembly & Jobs)
A significant enhancement introduced in the 2023 Wave 2 update was the ability to define warehouse handling for internal operations separately from sales and purchase flows. Previously, a location's warehouse settings were largely "all or nothing," which could force complex warehouse rules onto simpler internal processes, causing friction for users.
Now, the Location Card features four dedicated fields that allow you to precisely define the process for each internal operation
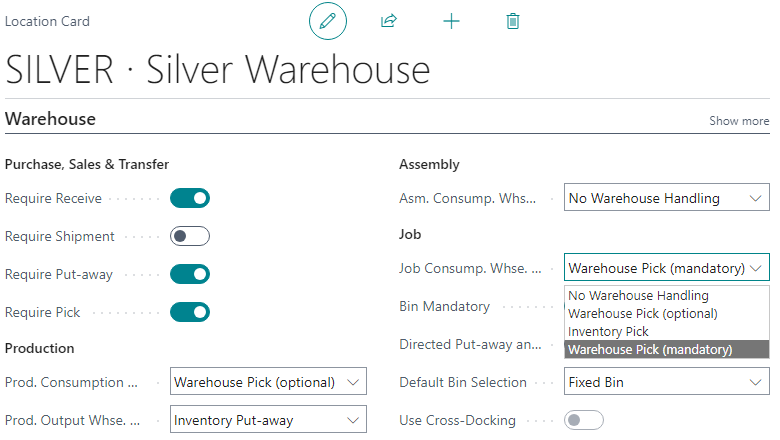
- Production consumption (Prod. Consump. Whse. Handling) – Controls how components are issued to a production order. Options are:
- No warehouse handling (use inventory journals or no pick)
- Inventory Pick/Movement (use a basic inventory movement/pick for consumption)
- Warehouse Pick (optional) – a non-mandatory pick (for compatibility with older behavior)
- Warehouse Pick (mandatory) – require a formal pick for production consumption.
For example, set this to Warehouse Pick (mandatory) if you always want a pick worksheet for production components, or use Inventory Pick/Movement if you want a simpler inventory journal approach.
- Production output (Prod. Output Whse. Handling) – Controls how finished items from production are put into inventory. Options are:
- No warehouse handling or
- Inventory Put-away. Choose Inventory Put-away if you want to generate a put-away document for finished goods.
- Assembly consumption (Asm. Consump. Whse. Handling) – Controls how components are issued for assembly orders. Options include:
- No warehouse handling,
- Warehouse Pick (optional),
- Inventory Move, For example, Inventory Move can be used for quick internal moves if you do not need a formal pick document.
- Warehouse Pick (mandatory).
- Job consumption (Job Consump. Whse. Handling) – Controls issuance for jobs. Options are:
- No warehouse handling,
- Warehouse Pick (optional),
- Inventory Pick, or
- Warehouse Pick (mandatory).
By selecting the appropriate option for each process, you define exactly how physical picking and movement occur. For instance, setting Assembly consumption to Warehouse Pick (mandatory) ensures a pick is generated for every assembly order, while No warehouse handling would skip any WMS steps and use inventory journals directly.
Each field can be set to “No warehouse handling” if you do not need formal warehousing for that step, or to an optional/mandatory pick or movement if you do. For example, if your production team pulls materials directly without recording a pick, you could set Production Consumption to Inventory Pick/Movement. If you want strict warehousing, you could choose Warehouse Pick (mandatory) so that every production consumption requires a pick document
Advanced Setup: Mastering Directed Put-away and Pick (DPAP)
Enabling Directed Put-away and Pick (DPAP) on the Location Card transforms it into a full-fledged WMS location where the system directs and guides all warehouse activities. This is a major configuration commitment and should only be used for complex operations that require a high degree of automation and control.
The Impact of Enabling DPAP
Activating the Directed Put-away and Pick toggle is an irreversible step once transactions are posted. It locks the other primary handling toggles and automatically sets the internal handling fields to enforce a strict, consistent WMS workflow. Specifically:
- Production consumption is set to Warehouse Pick (mandatory).
- Assembly consumption is set to Warehouse Pick (mandatory).
- Production output is set to No warehouse handling.
- Job consumption is set to No warehouse handling, as the Jobs module is not supported in DPAP locations.
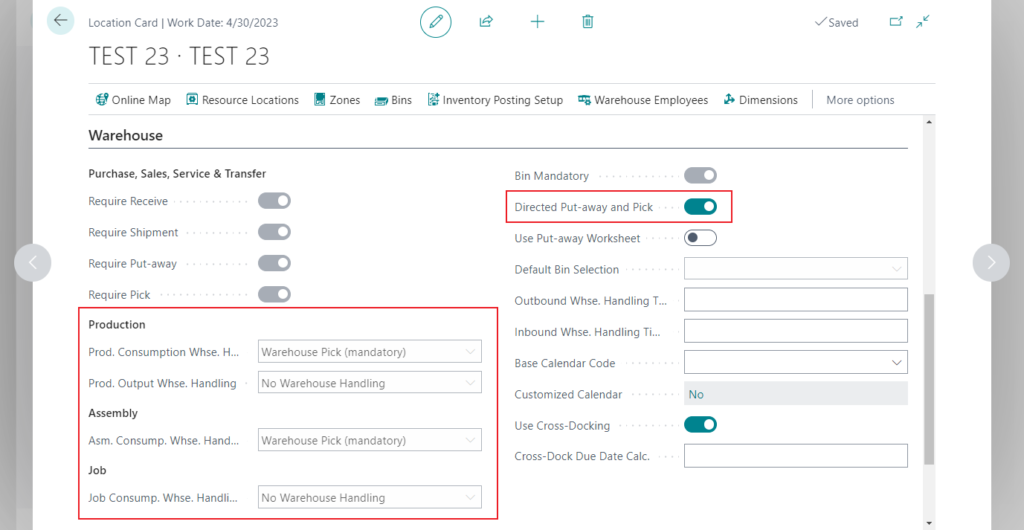
Key Concepts in a DPAP Environment
With DPAP enabled, you must provide the system with rules to make intelligent decisions.
- Put-away Templates: These are rule sets that tell Business Central where to place incoming items. Templates use criteria like Warehouse Class (e.g., "Frozen," "Hazardous") and Bin Ranking to find the most appropriate storage bin.
- Bin Ranking: You can assign a rank to your bins to control picking and replenishment logic. The system will suggest picking from the highest-ranked bins first. For replenishment, it will suggest moving items from lower-ranked bins (like bulk storage) to higher-ranked bins (like forward picking areas).
- Movement Worksheet: In an advanced warehouse, the Movement Worksheet is the primary tool for planning and creating internal inventory movements and replenishments based on bin rankings and demand.
This automatic configuration ensures that warehouse staff use pick/put-away documents to move items in and out of bins. For example, with DPAP enabled a production order’s components will always generate a pick worksheet, and finished goods will go straight into inventory (no additional put-away step).
Tip: Use DPAP for large or complex warehouses where bin-level control and automated templates are needed. If you enable it, be sure to also set up bin templates and put-away/picking strategies on the Bins and Put-away Template pages so that the system can direct workers to the correct bins.
Best Practices for a Flawless Warehouse Setup
A successful implementation goes beyond just knowing which buttons to click. It requires a strategic approach grounded in best practices.
- Start with the Process, Not the Tech: Before configuring, map your real-world warehouse processes and align user roles. If your warehouse team is separate from your order entry team, enable
Require Shipmentto create a clear handoff. - Don't Automate a Mess: This is a critical rule. A WMS will not fix a physically disorganized warehouse; it will only make you disorganized faster and with more system errors. Clean up and organize your physical space and processes before implementing advanced warehousing.
- Test, Test, Test: Always use a sandbox or test company to configure and walk through your entire warehouse flow—from receipt to shipment. This allows you to catch configuration errors and process gaps without disrupting live operations.
- Keep It Simple (When You Can): Resist the temptation to enable advanced features "just because they're there." If a simpler process meets your business needs, use it. Over-configuration is a common cause of implementation failure and user frustration.
- Factor in Handling Times: For more precise order scheduling and planning, utilize the Inbound Warehouse Handling Time and Outbound Warehouse Handling Time fields on the Location Card. Defining these times helps the system calculate more realistic receipt and shipment dates.
- Choose internal handling wisely: For production or assembly, decide whether to use inventory or warehouse documents. For strict control, use Warehouse Pick (mandatory); for simpler processes, use Inventory Pick/Move or No handling so that items are consumed with inventory journals.
- Set warehouse calendars: If you use handling times, enter Inbound and Outbound Warehouse Handling Time on the Location Card. These settings help schedule when orders should arrive or ship based on how many days your warehouse needs.
- Manage user roles: Assign users as Warehouse Employees and define Responsibility Centers so that permissions align with the processes they perform (e.g., picking vs. shipping).
- Data Integrity is King: Ensure your foundational data is accurate. Errors in Bills of Material (BOMs) or Unit of Measure conversions will cascade into significant inventory and warehousing problems that are difficult to untangle later.
- Document Everything: Create a simple guide with screenshots that documents the setup for each location. This is invaluable for training new employees and for troubleshooting issues in the future.
By carefully configuring the Location Card and related warehouse settings, you can optimize Business Central for your organization’s flow of goods. Well-defined warehouse settings help ensure that picking, shipping, receiving, and production flows all follow your intended processes.
Troubleshooting Common Warehouse Setup Errors
Even with careful planning, you may encounter errors. Here are solutions to some of the most common and confusing issues. if you have and other errors, you can ask it at our Business Central Solutions Community Planform!
| Error | Problem | Cause | Solution |
|---|---|---|---|
| "Directed Put-away and Pick must be equal to 'No' in location..." when using Jobs | Attempting to consume inventory for a Job from a DPAP-enabled location causes a blocking error. | Jobs module is not compatible with strict workflows of DPAP-enabled locations. Business Central sets Job Consump. Whse. Handling to No when DPAP is enabled. | Use a two-step transfer: 1. Move items from the DPAP location to a non-DPAP staging location via Warehouse Item Journal.2. Consume items for the job from the staging location. |
| "Nothing to Handle" when Creating a Pick | User tries to create a pick but gets an error even though inventory appears on hand. | - Inventory Unavailability: Stock is reserved or on another unposted pick.- Missing Qty. to Ship: Source document line lacks this field value.- Incorrect Bin Content: Item isn't in a "pickable" bin. | 1. Check Qty. to Ship on the source document.2. Use Item Availability by Location and check Reservation Entries.3. For clearer errors, go to Warehouse Setup and set Receipt and Shipment Posting Policy to 'Stop and show the first posting error'. |
| The Critical "Adjustment Bin Conundrum" During DPAP Setup | Enabling DPAP on a location with existing inventory leads to setup corruption. | System tries to move inventory into an Adjustment Bin, but DPAP requires all bins to have Zone and Bin Type Codes — which cannot be set before DPAP is enabled, causing a catch-22. | Do not use standard UI.1. Define Zones and Bin Types first.2. Use a Configuration Package (RapidStart) to create all bins (including Adjustment Bin) with correct Zone and Bin Type Codes.3. Then run Create Warehouse Location. |
Conclusion and Frequently Asked Questions
Mastering warehouse handling in Dynamics 365 Business Central is a journey that begins with strategy, not software settings. By first understanding your operational reality and choosing the appropriate level of complexity—be it basic inventory, order-by-order warehousing, or a full-scale WMS with directed put-away and pick—you lay the foundation for success.
From there, the Location Card serves as your command center, allowing you to meticulously configure inbound, outbound, and internal flows to match your chosen strategy. By embracing best practices like organizing your physical space first, testing thoroughly in a sandbox, and documenting your setup, you can avoid common pitfalls. Armed with the troubleshooting knowledge to solve complex errors, you can transform your warehouse from a cost center into a streamlined, accurate, and scalable strategic asset that drives business growth.
What is warehouse handling in Dynamics 365 Business Central?
Warehouse handling in Business Central refers to the configuration and control of inbound, outbound, and internal item movements using settings like Require Pick, Require Put-away, and Warehouse Pick/Put-away documents.
How do I enable warehouse handling in Business Central?
You can enable warehouse handling by opening the Location Card and configuring fields such as Require Receipt, Require Put-away, Require Pick, and Directed Put-away and Pick depending on your process needs.
What does the ‘Directed Put-away and Pick’ setting do in Business Central?
This setting activates advanced warehouse workflows that enforce strict bin-level control for picking and put-away tasks. It also locks other warehouse handling options to ensure consistency.
What is the difference between inventory and warehouse picks in Business Central?
An inventory pick is used in Basic Warehousing. It is created one-to-one from a source document and posts the shipment directly. A warehouse pick is used in Advanced Warehousing (DPAP). It can be created from a warehouse shipment that consolidates multiple orders, and it must be "registered" as a separate step before the shipment can be posted.
Can I use warehouse handling for production and assembly orders in Business Central?
Yes, Business Central allows configuration of warehouse handling for production, assembly, and job orders using options like Warehouse Pick (mandatory) or Inventory Movement.
Is Bin Mandatory required for warehouse handling in Business Central?
While not technically required to enable some toggles, it is a fundamental best practice. Any location that aims to track inventory at a bin level should have Bin Mandatory enabled. Without it, pick and put-away documents lose much of their value as bin specification is not enforced.
What are the best practices for warehouse handling configuration in Business Central?
Best practices include aligning settings with operational roles, testing configuration in a sandbox, documenting your setup, and enabling Directed Put-away and Pick for complex warehouses.
How do I configure warehouse handling for a new location in Business Central?
Go to Locations, open the Location Card, and under the Warehouse FastTab, set your desired options like Require Pick, Require Put-away, and other relevant settings.
Can I disable warehouse handling once it's enabled in Business Central?
For basic setups, yes, but it should be done with extreme caution in a test environment first, as it can impact open documents. For a location where Directed Put-away and Pick has been enabled and transactions have been posted, the setting is locked and cannot be disabled.
How do I set up barcode scanning (ADCS) in Business Central?
Automated Data Capture System (ADCS) integrates handheld barcode scanners to streamline the physical execution of warehouse tasks. The setup is technical and involves enabling web services, configuring "miniforms" (the screens displayed on the scanner), and assigning item identifiers (barcodes).
For specific hardware, working with a Microsoft partner is often necessary to ensure proper integration.
How does warehouse management integrate with manufacturing?
Business Central allows for tailored warehouse processes for production. Using the dedicated internal handling fields on the Location Card (e.g., Prod. Consump. Whse. Handling), you can mandate a Warehouse Pick for components needed for a production order and use an Inventory Put-away to place finished goods into stock, all within the same location.
