

In today's interconnected business environment, the ability to seamlessly share data between core systems and specialized applications is not just a convenience—it is a strategic necessity. Dynamics 365 Business Central, Microsoft's comprehensive enterprise resource planning (ERP) solution for small and midsize businesses, stands at the center of this ecosystem. Its power is fully unlocked through its Application Programming Interfaces (APIs), which serve as the essential bridge for integrating the ERP with third-party software and services. By using these APIs, businesses can create a unified, cohesive system where data flows freely between financial, sales, supply chain, and operational modules and external platforms like e-commerce sites, CRM systems, or custom-built applications.
At its foundation, the Business Central API is a tool that allows different software applications to communicate and exchange data over the internet. Microsoft has built the modern Business Central API stack on a REST (Representational State Transfer) architecture, which is the predominant standard for building web services. This adherence to REST principles ensures that integrations are lightweight, scalable, and efficient.
Furthermore, the APIs conform to the OData (Open Data Protocol) v4 standards, an ISO/IEC-approved OASIS standard that defines best practices for building and consuming RESTful APIs. This commitment to OData v4 means developers can use standardized query syntax to filter, sort, and select data, making interactions predictable and powerful. The entire API stack is optimized for performance and is Microsoft's preferred method for all integrations with Business Central. Data is typically exchanged in JSON (JavaScript Object Notation) format, a lightweight and human-readable format that has become the de facto standard for modern web APIs.
Microsoft frames the development of these integrations as the creation of "Connect Apps." A Connect App establishes a direct, point-to-point connection between Business Central and a third-party solution, enabling the interchange of data. A key advantage of this architecture is its language-agnostic nature; any programming language or tool capable of making standard REST API calls—be it Python, C#, Java, or a low-code platform—can be used to develop a Connect App and interact with Business Central data. This approach reflects a strategic shift from the platform's legacy roots in Dynamics NAV to a modern, extensible, and developer-friendly cloud service, designed to thrive within a broad and diverse technology ecosystem.
Table of Contents
The Business Central API Landscape: Standard vs. Custom
Integrating with Dynamics 365 Business Central involves making a critical strategic choice between using Microsoft's pre-built APIs and developing your own. This decision hinges on a trade-off between the speed and simplicity offered by Standard APIs and the power and flexibility provided by Custom APIs. Understanding the characteristics, strengths, and limitations of each type is fundamental to designing an effective and sustainable integration architecture.
Standard APIs (v2.0): The Out-of-the-Box Solution
For many common integration scenarios, Microsoft provides a comprehensive suite of Standard APIs. These are built-in, ready-to-use endpoints that require no custom coding and minimal setup to use. They are designed to expose a wide array of standard business entities, such as customers, vendors, sales orders, items, journal entries, and general ledger data. These APIs are part of the core product and are maintained by Microsoft, ensuring they remain stable and updated with the platform.
The current and recommended version is API v2.0, and it is best practice to always utilize the highest version available to benefit from the latest features, performance optimizations, and security enhancements. The primary advantage of using Standard APIs is the speed of development; an integration can be established quickly without needing deep expertise in Business Central's internal data structure or the AL programming language.
Custom APIs: For Tailored Business Needs
When the out-of-the-box Standard APIs do not meet specific business requirements, developers have the power to create Custom APIs. These are developed using Business Central's native programming language, AL (Application Language), and are built with specialized object types: API Pages and API Queries.
- API Pages are used to expose data from tables in a structured, entity-based manner, supporting full CRUD (Create, Read, Update, Delete) operations.
- API Queries are highly optimized for read-only data retrieval, allowing for complex joins and aggregations across multiple tables with superior performance compared to API Pages.
Custom APIs offer unparalleled flexibility. They allow developers to expose specific data fields (including custom fields added to tables), implement complex business logic, and fine-tune performance for unique use cases. This is the ideal path for proprietary integrations or when the data structure required by an external application does not align with the schema of the Standard APIs.
A Critical Distinction: Extending vs. Creating APIs
A crucial limitation that every developer must understand is that Standard APIs cannot be directly extended or modified to include additional fields. For example, if a custom field like "Customer Loyalty Tier" has been added to the Customer table in Business Central, this field cannot be added to the standard customers API endpoint.
To expose such custom data, the only viable approach is to create a new Custom API from scratch. A common development pattern involves copying the source code of the existing Standard API (which Microsoft makes available in the ALAppExtensions repository) and using it as a template for a new Custom API, adding the required custom fields to the new API page definition. This distinction makes the choice between Standard and Custom APIs a clear-cut decision based on data requirements.
A Note on Automation & Admin APIs
Beyond the Standard and Custom APIs used for data integration, Business Central offers other specialized APIs to serve specific administrative and operational functions:
- Automation APIs: These are designed to facilitate the automation of business processes, often used in scenarios that require scripted interactions without a user interface.
- Admin Center APIs: These powerful APIs are used for programmatic management of Business Central environments, such as creating, copying, or deleting environments, and managing AppSource app installations.
The following table provides a summary to help guide the decision-making process for choosing the right API type.
| API Type | Best For | Key Characteristics | Development Effort |
|---|---|---|---|
| Standard API (v2.0) | Common integration scenarios like syncing customers, sales, and items. | Out-of-the-box, no-code setup, maintained by Microsoft, cannot be extended. | Low |
| Custom API | Integrations requiring custom fields, specific business logic, or optimized performance. | Highly flexible, exposes any data, built with AL, requires development expertise. | Medium to High |
| Automation API | Scripting and automating internal Business Central processes. | Optimized for background tasks and process automation. | Medium |
| Admin Center API | Programmatic administration of Business Central tenants and environments. | Provides administrative control over the tenant. | Medium |
Getting Started: Your First API Call with Postman & OAuth 2.0
The single most significant hurdle for developers new to the Business Central API is mastering the authentication process. It is a multi-step procedure that spans two distinct Microsoft platforms: Microsoft Entra ID (formerly Azure Active Directory) and the Business Central environment itself. A misconfiguration in either part will prevent a successful connection. This detailed, step-by-step tutorial will guide you through the entire process, from initial setup to making your first successful API call using Postman.
The Authentication Prerequisite: Moving from Basic Auth to OAuth 2.0
In the past, integrations with Business Central could use Basic Authentication, which involved sending a username and a Web Service Access Key with each request. However, this method is now considered insecure and has been deprecated and completely removed for Business Central Online environments.
The modern and mandatory standard for authenticating with Business Central Online is OAuth 2.0. This is a secure, token-based authentication framework that allows an application to obtain limited access to a user's data without exposing their credentials. The process involves registering the application with Microsoft Entra ID, which then issues access tokens that are sent with each API request to prove the application's identity and permissions.
Authentication: Typically Basic Authentication is used for testing. Use your Business Central user name as the username, and the Web Service Access Key from that user’s card as the password. (Alternatively, OAuth tokens can be used – see Microsoft Docs for OAuth setup.)

Step 1: Configure a Microsoft Entra ID App Registration
The first phase of the setup takes place in the Azure portal. Here, you will register your external application and define the permissions it requires.
- Navigate to Microsoft Entra ID: Sign in to the Azure portal (
portal.azure.com) and navigate to the Microsoft Entra ID service. - Create a New App Registration: In the left-hand menu, select App registrations and click + New registration.
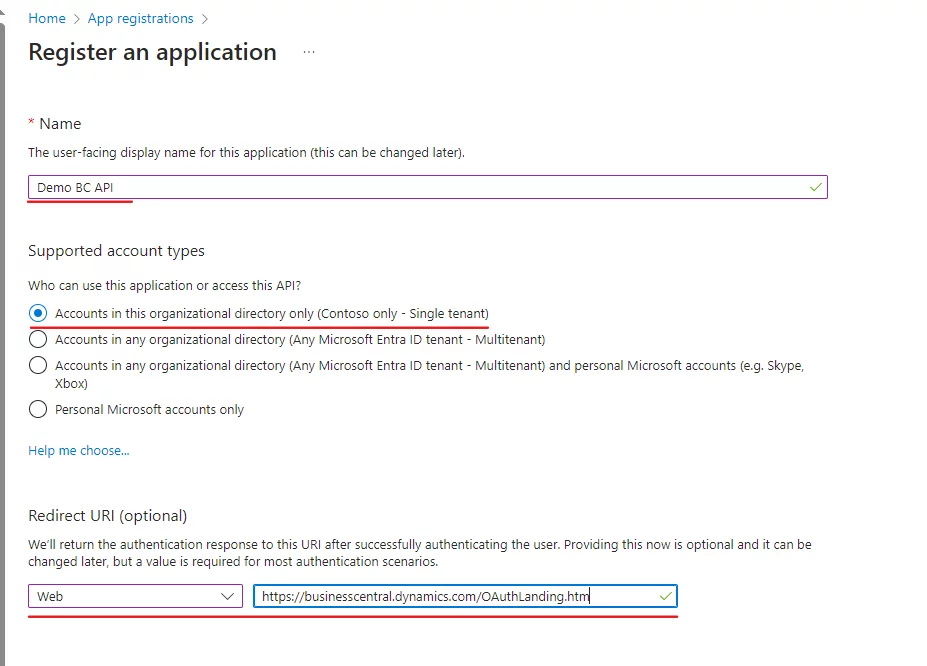
- Register the Application:
- Provide a descriptive Name for your application (e.g., "My BC Integration App").
- For Supported account types, select "Accounts in this organizational directory only (Single tenant)."
- Under the Redirect URI section, select Web as the platform and enter the following specific URI:
https://businesscentral.dynamics.com/OAuthLanding.htm. This is a crucial step that enables the OAuth 2.0 authorization flow. - Click Register.
- Configure API Permissions:
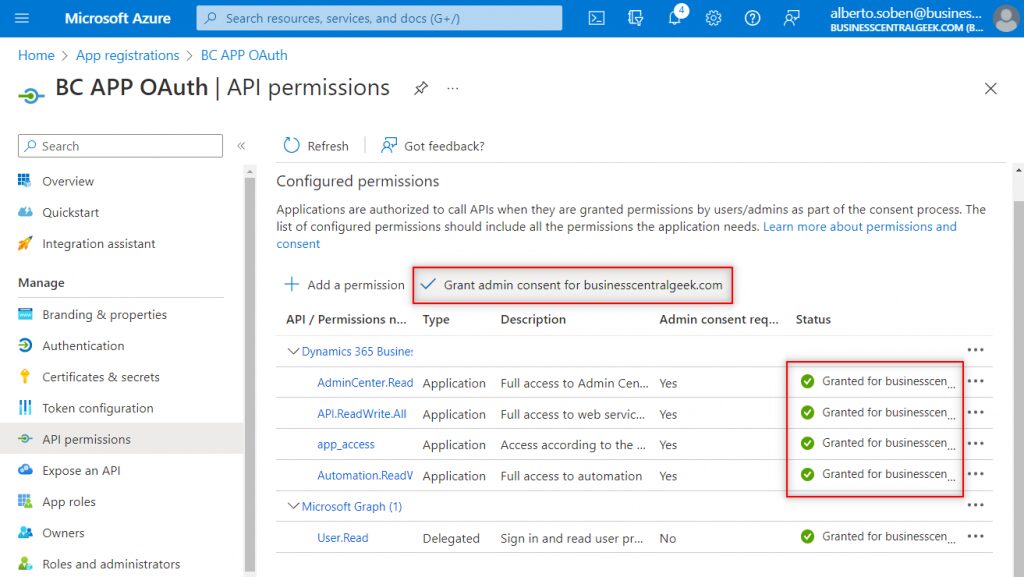
- Once the app is registered, navigate to the API permissions tab.
- Click + Add a permission, then select Dynamics 365 Business Central from the list of APIs.
- You will be asked to choose between Delegated permissions (the app acts on behalf of a signed-in user) and Application permissions (the app runs as a background service with its own identity). For many integrations, Delegated permissions are appropriate. Select Delegated permissions.
- Check the boxes for the required permissions. A common and powerful permission is
Financials.ReadWrite.All, which grants read and write access to financial data. Also, adduser_impersonationto allow the app to act as the user. - Click Add permissions.

- Grant Admin Consent: After adding permissions, you must grant consent for your organization. Click the Grant admin consent for button and confirm. This step is mandatory for the permissions to take effect.
- Create a Client Secret:
- Navigate to the Certificates & secrets tab.
- Click + New client secret. Provide a description and select an expiration period.
- Click Add. A new secret will be generated. Crucially, you must copy the secret's Value immediately and store it in a secure location (like a password manager or secure vault). This value will be hidden forever after you navigate away from this page.

- Note Your IDs: From the Overview tab of your app registration, copy the Application (client) ID and the Directory (tenant) ID. You will need these, along with the client secret, for the next steps.
Step 2: Link Microsoft Entra Application in Business Central
Having a valid app registration in Azure is only half the battle. You must now explicitly authorize this application within your Business Central environment. Forgetting this step is the most common reason for authentication failures, even when the Azure setup is perfect.
- Open Microsoft Entra Applications Page: Sign in to your Business Central environment. Use the "Tell Me" search feature to find and open the Microsoft Entra Applications page.
- Create a New Application Entry: Click + New to create a new entry.
- Enter the Client ID: In the Client ID field, paste the Application (client) ID you copied from the Azure App Registration. Add a descriptive name in the Description field.
- Assign Permissions: This is a critical security step. You must assign specific permission sets to the application to define what it is allowed to do within Business Central. This is done in the same way you would assign permissions to a user. Note: For security reasons, you cannot assign the SUPER permission set to an application. You must assign granular permissions that align with the application's purpose.
- Enable and Grant Consent: Ensure the State of the application is set to Enabled. You may also need to grant consent from within Business Central by using the Grant Consent action on the page. This finalizes the link between the Entra ID app and Business Central.

Step 3: Configure Postman and Make a Test Request
With the setup in both Azure and Business Central complete, you are now ready to use an API client like Postman to get an access token and make your first API call.
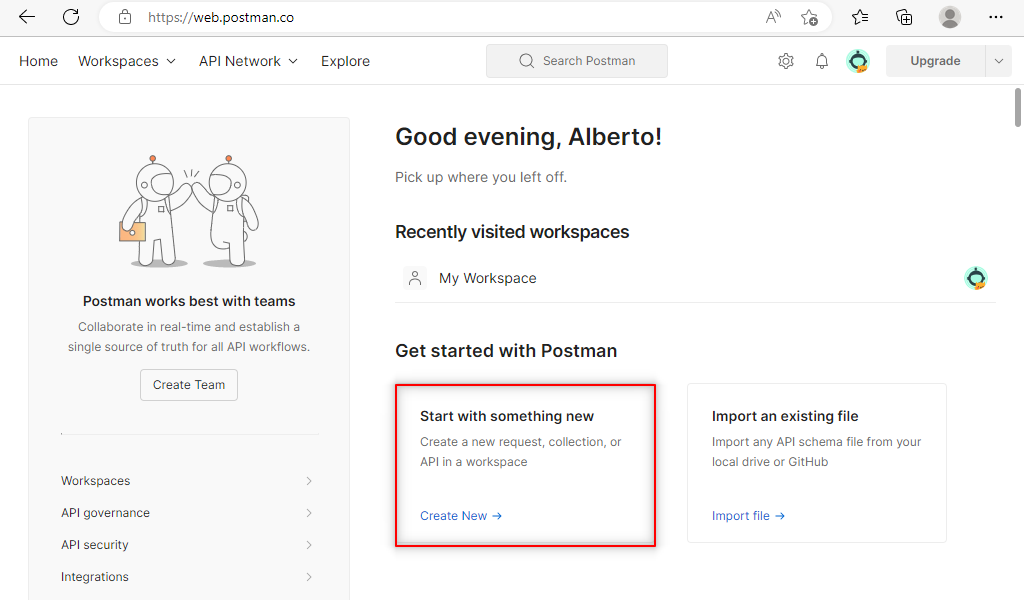
- Create a New Request in Postman: Open Postman and create a new HTTP request.

- Configure OAuth 2.0 Authorization:
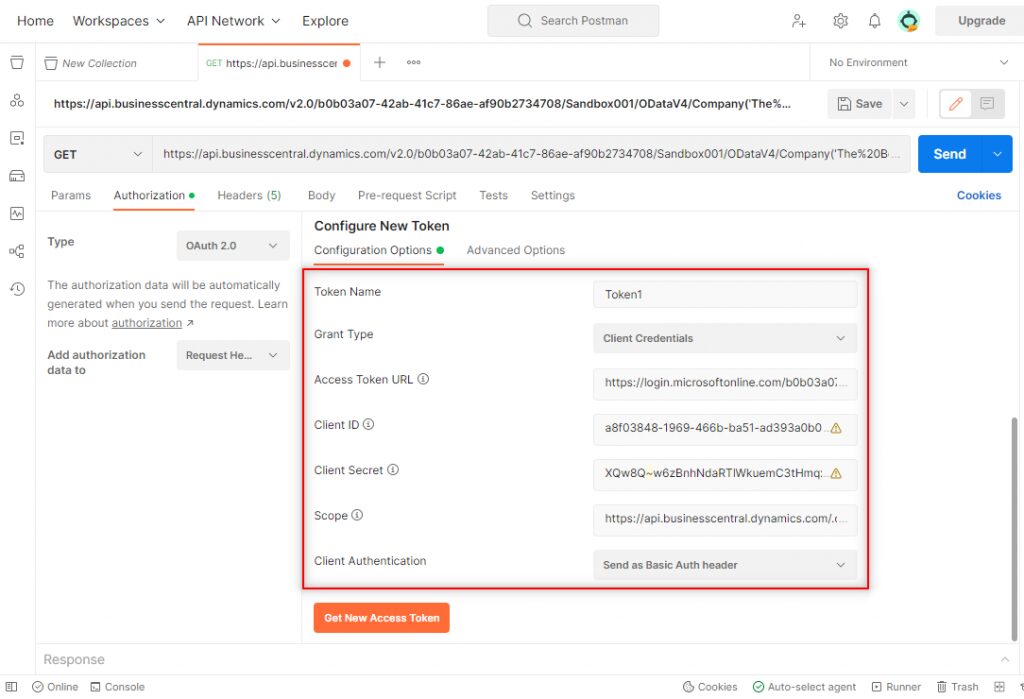
- Go to the Authorization tab and select OAuth 2.0 from the Type dropdown.
- Scroll down to the Configure New Token section and fill in the following details:
- Token Name: A descriptive name, e.g., "Business Central Token".
- Grant Type: Select Authorization Code. This type is used for interactive, user-delegated scenarios.
- Callback URL: Enter
https://businesscentral.dynamics.com/OAuthLanding.htm. - Auth URL:
https://login.microsoftonline.com/{tenant_id}/oauth2/v2.0/authorize(replace{tenant_id}with your Directory (tenant) ID). - Access Token URL:
https://login.microsoftonline.com/{tenant_id}/oauth2/v2.0/token(replace{tenant_id}with your Directory (tenant) ID). - Client ID: Paste your Application (client) ID.
- Client Secret: Paste the client secret value you saved earlier.
- Scope:
https://api.businesscentral.dynamics.com/.default. This scope requests all permissions that were granted to the application.
- Get the Access Token: Click the Get New Access Token button at the bottom. Postman will open a new window prompting you to sign in with your Microsoft account and consent to the permissions requested by the application. After successful authentication, Postman will receive the token.
- Use the Token: In the "Manage Access Tokens" window that appears, click Use Token. This will apply the retrieved bearer token to your request's authorization header.
- Construct the Request URL and Send:
- In the request URL bar, enter a valid Business Central API endpoint. A good first test is to get a list of companies:
https://api.businesscentral.dynamics.com/v2.0/{tenant_id}/{environment_name}/api/v2.0/companies - Replace
{tenant_id}with your tenant ID and{environment_name}with the name of your Business Central environment (e.g., "Production" or "Sandbox"). You can find your environment name in the top right corner of the Business Central web client.- For example, if your tenant ID is
d8f36038-1f93-4543-affc-5dc92b6ee871and environment isSandbox03, the endpoint is:https://api.businesscentral.dynamics.com/v2.0/d8f36038-1f93-4543-affc-5dc92b6ee871/Sandbox03/api/v2.0/
- For example, if your tenant ID is
- Click Send.
- If everything is configured correctly, you should receive a
200 OKstatus code and a JSON response containing a list of the companies in your environment. This confirms your connection is working.
- In the request URL bar, enter a valid Business Central API endpoint. A good first test is to get a list of companies:

Sandbox03). Use these to build your API endpoint URL.Find out more about Endpoints for the APIs for Dynamics 365 Business Central On-Premises and Online from Microsoft Docs.
Finding and Listing Business Central Standard APIs
Dynamics 365 Business Central provides many pre-defined API resources (entities) out-of-the-box. To see what APIs are available:
- List APIs via GET: In Postman or another HTTP client, send a GET request to the root of your API endpoint. For example:
GET https://api.businesscentral.dynamics.com/v2.0/{tenant}/{environment}/api/v2.0/with Basic Auth.
This returns a JSON payload of available API entity sets (names likecustomers,items,salesOrders, etc.).

value array.- Microsoft Docs: Alternatively, refer to the official API documentation. The Business Central API v2.0 documentation lists each resource (e.g. salesOrder, item, customer). Each resource page shows which methods (GET, POST, PATCH, DELETE) are supported.
- Source Code: If you have access, search the Business Central AL code for
PageType = APIto find custom or standard API pages.
The full standard API list for BC 17.1 (as of Nov 2020) includes 54 entity sets (such as companies, items, customers, salesOrders, purchaseInvoices, vendors, etc.). The URL for each is typically the plural name (e.g. salesOrders for the Sales Order API).
Once you know the entity name (URL), you can perform basic operations on it. The common HTTP methods are summarized here:
| Method | Description | Example URL (Sales Orders) |
|---|---|---|
| GET | List collection | GET .../companies(...)/salesOrders |
| GET | Get a single member by ID | GET .../companies(...)/salesOrders({id}) |
| POST | Create new record in collection | POST .../companies(...)/salesOrders |
| PATCH | Update an existing record (specify ID) | PATCH .../companies(...)/salesOrders({id}) |
| DELETE | Delete a record (specify ID) | DELETE .../companies(...)/salesOrders({id}) |
| POST | Invoke a bound action | POST .../salesInvoice({id})/Microsoft.NAV.post |
| POST | Batch multiple requests | POST .../$batch |
(URLs in the examples assume a company context like companies({companyId})). For example, to list sales orders in a company, you would use:
GET https://api.businesscentral.dynamics.com/v2.0/{tenant}/{env}/api/v2.0/companies({company-id})/salesOrders
Always include the company ID when querying tables specific to a company. The company ID comes from your /companies GET result.
You can find the list from Microsoft Docs Welcome to the API(v2.0) for Dynamics 365 Business Central.
You can also search for pagetype = API in the standard source code to find them.

Performing GET Operations
The GET method retrieves data. You can get an entire collection (list) or a single record by ID. You can also apply OData query options ($filter, $select, $orderby, etc.) to shape the results.
Retrieving a Collection (List)
To retrieve a list of entities (e.g. all companies or all sales orders), send GET to the entity set endpoint. For example, to list all companies:
GET {endpoint}/companies
Using Postman, set Authorization (Basic) and click Send. This returns JSON array of company records:

id, name, and displayName, etc. The value array contains all company records.The highlighted red box in the image shows the returned JSON of companies (e.g. "My Company 02", "My Company 03"). You can then pick a company’s id from this list for further queries.
Tip: The table above [Number 2: companies, EntitySet companies, URL companies] indicates the API URL to use. The Word “companies” in the URL corresponds exactly to the entity name shown in the API list.
Retrieving a Single Record
To get a specific record, append its GUID in parentheses. For example, to get one company by ID:
GET {endpoint}/companies({companyId})
Replace {companyId} with the actual GUID from the companies list. In Postman, use Basic Auth and send the request.

id, name, displayName, etc.Similarly, to get one sales order, you would use:
GET {endpoint}/companies({companyId})/salesOrders({orderId})
where {orderId} is the GUID of a specific sales order.
Retrieving Data (GET) with OData Query Parameters
The GET method is used to read or retrieve data from Business Central. A simple GET request to an endpoint like /customers will return a collection of all customer records. However, in most real-world scenarios, you will want to refine this result set. This is where OData query parameters become invaluable. They are appended to the request URL to filter, sort, and shape the data returned by the API.
The following table provides a cheat sheet for the most essential OData query operators, which are used within the $filter parameter.
| Operator | Description | Example URL |
|---|---|---|
eq | Equal | .../items?$filter=blocked eq false |
ne | Not equal | .../customers?$filter=city ne 'London' |
gt | Greater than | .../salesInvoices?$filter=totalAmountIncludingTax gt 1000 |
lt | Less than | .../items?$filter=inventory lt 10 |
and | Logical AND | .../items?$filter=blocked eq false and inventory gt 0 |
or | Logical OR | .../customers?$filter=city eq 'London' or city eq 'Paris' |
contains() | Checks if a string field contains a substring. | .../customers?$filter=contains(displayName, 'Corporation') |
startswith() | Checks if a string field starts with a substring. | .../customers?$filter=startswith(displayName, 'Adatum') |
endswith() | Checks if a string field ends with a substring. | .../customers?$filter=endswith(email, '@contoso.com') |
Business Central APIs support standard OData query options to filter or shape data:
- $filter: Returns only records matching criteria (rows).
Example: Get sales orders where customer number = 10000.
GET .../companies({companyId})/salesOrders?$filter=customerNumber eq '10000'Remember to use single quotes around literal strings. The field names must match the API schema names, which you can find in the JSON output (for example, customerNumber in the response).
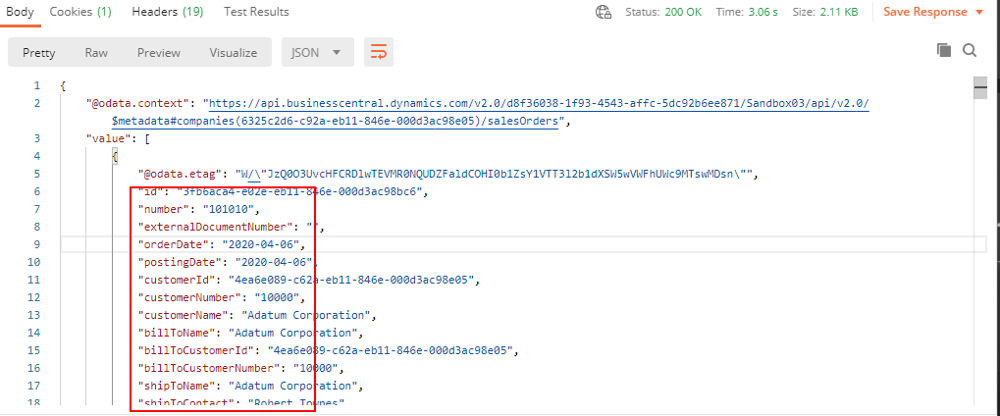
"4ae60...": "Adatum Corporation"). The response value array shows filtered rows.- $select: Specifies which fields (columns) to return. Helps reduce payload.
Example: Get only Number, Posting Date, Customer No., Customer Name for sales orders:
GET .../salesOrders?$select=number,postingDate,customerNumber,customerNameThis will return each sales order with only those properties.
- $orderby: Sort results.
Example: Sort sales orders by Customer No. descending:
GET .../salesOrders?$orderby=customerNumber desc- $top: Limits the number of records returned (useful for pagination).
Example: Get only the top 3 sales orders:
GET .../salesOrders?$top=3- $skip: Skips a number of records (useful with $top for paging).
Example: Skip first 9 sales orders:
GET .../salesOrders?$skip=9- $expand: Retrieve related resources.
Example: Get sales orders including their sales lines:
GET .../salesOrders?$expand=salesOrderLines(This will include each order’s lines in the JSON.)
- $count: Get the total count of matching records instead of the data.
Example: Count of all sales orders:
GET .../salesOrders/$countEach of these options can be combined, e.g. ?$filter=...&$select=...&$orderby=....
Creating New Records (POST)
To create a new entity in Business Central, such as a new customer or a sales order, you use the POST HTTP method. The request must be sent to the collection endpoint (e.g.,/salesOrders).
The key components of a POST request are:
- Headers: You must set the
Content-Typeheader toapplication/jsonto indicate the format of the request body. - Body: The body of the request must contain a JSON object representing the new entity. The fields in the JSON object must match the writable properties of the API entity.
Example: Creating a new Sales Order
- Method:
POST - URL:
https://api.businesscentral.dynamics.com/v2.0/{tenant_id}/{env}/api/v2.0/companies({company_id})/salesOrders - Body:JSON
{ "customerId": "...", "customerNumber": "10000", "orderDate": "2025-10-26" }
A successful POST request will return a 201 Created status code along with the full JSON representation of the newly created record.
Following is step by Step Guide To Create new Records VIA Post:
- Set request: Choose
POSTin Postman and set the URL to the entity set (no ID in URL). For example:
POST {endpoint}/companies({companyId})/salesOrders
- Headers: Add header
Content-Type: application/json.
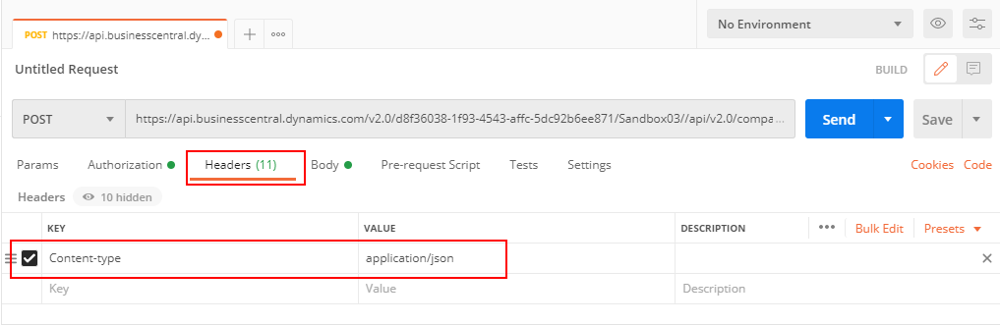
- Body: Switch to raw JSON and include the fields for the new record. Example JSON for a sales order might include
orderDate,customerNumber,currencyCode, etc.:
{ "orderDate": "2020-11-27","customerNumber": "50000","currencyCode": "GBP","externalDocumentNumber": "For API Demo","paymentTermsId": "7aa4e08b-..."}
- Send Request: Click Send. The API returns the created record (with its new
id, etc.), and the Sales Order appears in Business Central.
Always include all required fields in the JSON body. Check the API documentation for which fields are mandatory for each entity.
Updating Existing Records (PATCH)
Use PATCH to update one or more fields of an existing record.
- Set request: Choose
PATCHand target the specific record’s URL (including its GUID). Example: bashCopyEdit
PATCH {endpoint}/companies({companyId})/salesOrders({orderId})
- Headers: Set
Content-Type: application/jsonand addIf-Match: *(wildcard) to bypass concurrency checks if you don’t have the ETag.

- Body: In the raw JSON body, include only the fields you want to change. For example, to update the posting date and external document number:
{
  "postingDate": "2020-11-30",
  "externalDocumentNumber": "Update from API"
}
postingDate and externalDocumentNumber).- Send Request: Click Send. The response should be 204 No Content (or the updated record) and the record will be updated in Business Central.
Deleting Records with DELETE
To remove a record, send a DELETE request to its URL (including ID). For example:
DELETE {endpoint}/companies({companyId})/salesOrders({orderId})
No body is needed. Send the request:

A successful DELETE returns status 204 (No Content). Be careful: deleting is irreversible.
Production-Ready: Best Practices and Common Pitfalls
Transitioning an integration from a development sandbox to a live production environment requires more than just functional code. It demands a robust architecture that can handle real-world challenges like service limits, large data volumes, and security. Adhering to best practices is essential for building reliable, scalable, and maintainable applications that interact with the Business Central API.
"When you're starting with Business Central APIs, focus on mastering the authentication flow first. It's the most common hurdle. Once you have a working token in Postman, everything else falls into place much more easily. Don't try to boil the ocean; start with a simple GET request to the
companiesendpoint. That first successful200 OKis a huge milestone." — Jeremy Vyska, Microsoft MVP and author of Microsoft Dynamics 365 Business Central API v2.0 Reference.
Navigating API Rate Limits and Throttling
To ensure the stability and availability of the Business Central Online service for all tenants, Microsoft enforces API rate limits. These limits are not merely suggestions; they are fundamental design constraints that will break any integration that ignores them. An application that sends too many requests in a short period will receive an HTTP 429 Too Many Requests error, and its requests will be rejected until the rate falls back within the allowed threshold.
The architecture of your integration must be built from the ground up to respect these limits. A naive approach that attempts to sync thousands of records in a rapid-fire loop will inevitably fail in production. The correct approach is to implement a retry policy with exponential backoff. When a 429 error is received, the application should pause for a short, increasing duration before retrying the request. This prevents the application from overwhelming the service and allows it to recover gracefully.
The following table summarizes the key operational limits for Business Central Online.
| Limit Type | Environment | Value |
|---|---|---|
| API Rate Limit | Production | 600 requests / minute |
| API Rate Limit | Sandbox | 300 requests / minute |
| Request Timeout | Production & Sandbox | 10 minutes |
| Max Concurrent Requests | Production & Sandbox | 5 concurrent requests |
| Max Request Size | Production & Sandbox | 100 MB |
Handling Large Datasets with Paging and Batching
A common challenge is handling large datasets, such as fetching tens of thousands of item records or posting thousands of general journal lines. Attempting to retrieve such a large volume of data in a single request is impractical, as it will likely time out or exceed memory limits, in addition to violating rate limits.
The solution is paging. By using the $top and $skip OData query parameters, you can retrieve data in manageable chunks or "pages." For example, to fetch 20,000 items, you could make 400 separate requests, each asking for 50 items ($top=50), using $skip to advance through the dataset ($skip=0, $skip=50, $skip=100, and so on).
For write operations, the API supports batch requests, which allow you to combine multiple operations (e.g., several POST requests) into a single HTTP call. However, it is important to note that batch requests are themselves limited, typically to 100 operations per batch. For posting more than 100 records, the data must be split into multiple batch requests.
Secure Credential Management and Error Handling
Security and reliability are paramount in production environments.
- Secure Credential Management: The client secret generated in Microsoft Entra ID is a highly sensitive credential. It should never be hardcoded into your application's source code. Instead, use secure storage mechanisms like environment variables, Azure Key Vault, or other secret management services to store and access it at runtime.
- Robust Error Handling: Your application should be designed to handle more than just the
429throttling error. It should inspect the HTTP status code of every response. Codes in the2xxrange indicate success. Codes in the4xxrange indicate a client-side error (e.g.,400 Bad Requestfor invalid data,401 Unauthorizedfor authentication issues,404 Not Foundfor an invalid URL). Codes in the5xxrange indicate a server-side error. Your application should log detailed error information from the response body to facilitate debugging.
Real-World Use Cases for Business Central API Integration
The versatility of the Business Central API enables a vast range of applications that can streamline operations, enhance customer experiences, and provide deeper business insights. Here are some concrete examples of how these integrations are used in the real world:
- Financial Management and Reporting: Automate the creation of general journal entries from external systems, such as expense reporting software. Develop custom dashboards that retrieve real-time account balances and financial statements for analysis in tools like Power BI.
- Sales and E-commerce Integration: Create a two-way sync between Business Central and an e-commerce platform like Shopify or Magento. When a customer places an order online, a corresponding sales order is automatically created in Business Central. Conversely, when inventory levels are updated in the ERP, the stock information on the e-commerce site is updated in real-time.
- Customer Relationship Management (CRM): Keep customer data synchronized between Business Central and a CRM like Salesforce. When a sales representative updates a customer's contact information in the CRM, the change is automatically reflected in the customer record in Business Central, ensuring a single source of truth.
- Supply Chain and Vendor Management: Streamline the purchasing process by integrating with a vendor's ordering system. Purchase orders created in Business Central can be automatically sent to the vendor's API, and vendor bills can be created automatically when an electronic invoice is received.
- Power Platform Automation: Leverage the Microsoft Power Platform to create powerful, low-code workflows. For example, use Power Automate to create a flow that is triggered when a new item is created in Business Central. The flow could then call the API of a translation service to get product descriptions in multiple languages and update the item record accordingly.
Success Stories: APIs in Action
Theoretical knowledge is important, but seeing the tangible business impact of API integrations provides powerful motivation and justification for investment. Here are a few real-world examples of how businesses have leveraged Business Central APIs to achieve significant results:
- Case Study: E-commerce Automation. A retail company integrated its Shopify store with Business Central using a custom API. The solution automated the flow of sales orders, customer data, and inventory levels between the two platforms. The result was an 80% reduction in manual data entry and a 60% improvement in order processing speed, freeing up staff to focus on customer service and growth initiatives.
- Case Study: Unifying Sales and Finance. A B2B organization needed to align its sales and finance teams by connecting Salesforce with Business Central. By developing a custom API to sync customer accounts, sales orders, and payment statuses, they achieved a 50% reduction in data discrepancies and a 70% improvement in financial reporting speed. This provided a unified view of customer data, leading to better sales forecasting and more efficient operations.
- Case Study: Streamlining Multi-Company Reporting. A rapidly growing business with 25 distinct company entities within Business Central struggled with consolidated reporting. Logging in and out of each company to pull data was a time-consuming nightmare. By using an API-driven reporting tool, they were able to pull data from all locations into a single, unified report. This saved the accounting team hours of manual work each week and provided critical, real-time insights into the financial health of the entire organization.
Summary and Frequently Asked Questions
Dynamics 365 Business Central’s standard APIs (v2.0) provide a powerful way to integrate and automate tasks. You can retrieve data (GET list or single item), filter and sort with OData query options ($filter, $select, $orderby, etc.), and create/update/delete records with POST, PATCH, DELETE.
The examples above demonstrate using Postman to call these endpoints. Refer to Microsoft’s official API documentation for detailed schemas and to handle authentication (OAuth). With these REST APIs, developers can build connect apps or integrations in any language that can make HTTP calls, enabling Business Central data to flow to and from other systems.
What is the difference between Business Central API v1.0 and v2.0?
API v2.0 is the current, supported version of the standard API and should always be used for new development. It offers more entities, better performance, and aligns with the latest Microsoft API standards. API v1.0 is considered legacy and is being phased out. The transition to v2.0 is part of Microsoft's continuous improvement of the platform.
How do I connect to the Business Central API?
Connection to the Business Central Online API requires using the OAuth 2.0 authentication protocol. The process involves two main parts: 1) Registering your application in Microsoft Entra ID (Azure) to get a Client ID and Client Secret, and 2) Creating a corresponding application entry in the Microsoft Entra Applications page within Business Central and assigning it permissions.
What are the rate limits for API requests?
Business Central enforces rate limits to ensure service stability. For example, the maximum number of concurrent requests per user is 5, and the request queue size is limited to 95. Exceeding these limits results in a u0022429 Too Many Requestsu0022 error.
Can I add a custom field to a standard API like the Customers API?
No, you cannot directly modify or extend Microsoft's Standard APIs to include custom fields. If you need to expose custom data, you must create your own Custom API using the AL programming language and an API Page object that includes your custom fields.
How do I retrieve data using OData query options?
The Business Central API supports OData query options such as u003ccodeu003e$filteru003c/codeu003e, u003ccodeu003e$selectu003c/codeu003e, u003ccodeu003e$orderbyu003c/codeu003e, u003ccodeu003e$topu003c/codeu003e, and u003ccodeu003e$skipu003c/codeu003e to refine and control the data returned in API responses.
Is it possible to access ledger entries via the API?
Yes, you can access ledger entries like u0022Cust. Ledger Entryu0022 using the OData V4 endpoint. For example:u003cbru003eu003cbru003eGET https://api.businesscentral.dynamics.com/v2.0/{tenant}/sandbox/ODataV4/Company('My%20Company')/Cust_LedgerEntries
What tools can I use to interact with the Business Central API?
You can use tools like Postman to send HTTP requests to the API endpoints. This is particularly useful for testing and exploring the API's capabilities.
Are there limitations on the amount of data returned by the API?
Yes, the API has limitations on the number of records returned in a single response. For instance, the maximum number of entities per page is 20,000. If you need to retrieve more records, you should implement pagination using the u003ccodeu003e$skipu003c/codeu003e and u003ccodeu003e$topu003c/codeu003e OData query options.
How often is Business Central updated, and how does it affect the API?
Business Central follows Microsoft's Modern Lifecycle Policy, receiving continuous service updates and major updates every six months. These updates may introduce new API functionalities or deprecate existing ones, so it's important to stay informed about the latest changes.
Why am I getting a u0022429 Too Many Requestsu0022 error?
A u003ccodeu003e429u003c/codeu003e error indicates that your application is exceeding the API rate limits enforced by Business Central Online. For production environments, this limit is 600 requests per minute. To resolve this, you must implement throttling in your application, typically using a retry policy with exponential backoff to space out your requests.
How do I handle thousands of records without crashing my application?
To handle large datasets, you must use a paging strategy. Instead of requesting all records at once, use the u003ccodeu003e$topu003c/codeu003e and u003ccodeu003e$skipu003c/codeu003e OData query parameters to retrieve data in smaller, manageable chunks (e.g., 50 or 100 records at a time) in a loop until all records have been processed.
Is Basic Authentication still supported for Business Central Online?
No. Basic Authentication, which uses a Web Service Access Key, is deprecated and no longer supported for Business Central Online environments. All integrations must use the more secure OAuth 2.0 protocol for authentication.
Conclusion
The Dynamics 365 Business Central API is a robust, modern, and powerful gateway for extending the capabilities of the ERP. It transforms Business Central from a standalone accounting system into a connected, extensible hub for business operations. This guide has demonstrated that while the integration possibilities are vast, a successful implementation rests on mastering a few core pillars.
First, a thorough understanding of the authentication flow using OAuth 2.0 and Microsoft Entra ID is non-negotiable; it is the secure key that unlocks all API functionality. Second, the strategic choice between the simplicity of Standard APIs and the flexibility of Custom APIs is a foundational decision that will shape the entire integration project. Finally, building production-ready applications requires a deep respect for the platform's operational constraints. Adhering to best practices around API rate limits, data paging, and error handling is what separates a fragile prototype from a reliable, enterprise-grade solution.
By leveraging the step-by-step guidance, practical examples, and strategic considerations outlined here, developers and IT professionals are well-equipped to build powerful integrations that enhance productivity, streamline processes, and unlock the full potential of their Dynamics 365 Business Central investment.
Feel Free to ask any question Related To Business Central API at our Community Section!
