In the complex landscape of modern Enterprise Resource Planning (ERP) systems, the question "Who did what, and when?" is not merely a matter of curiosity; it is a cornerstone of robust security, stringent compliance, and unwavering operational integrity. Administrators of Microsoft Dynamics 365 Business Central are frequently tasked with producing what seems like a simple "user login history report." However, this request often belies a deeper need for a comprehensive auditing framework.
The capabilities within Business Central and the surrounding Microsoft ecosystem extend far beyond a simple login list, offering a sophisticated, multi-layered suite of tools designed to address a wide spectrum of monitoring and auditing requirements. Understanding the available tools is crucial, but understanding their context is even more important.
The auditing capabilities in Business Central have not appeared overnight; they have evolved. This evolution mirrors the journey of ERP systems from siloed, on-premise applications to integrated, cloud-native platforms. The journey begins with simple, application-specific features and progresses towards powerful, platform-wide solutions that treat Business Central as a critical component of an organization's entire data estate.
This guide serves as a definitive roadmap to navigating this landscape. It will deconstruct every major method for tracking user activity, from foundational login tracking to enterprise-grade compliance auditing. It will provide not just the "how" through detailed, step-by-step instructions for Tracking User Login History, but also the "why" and "when" through strategic analysis and clear comparisons.
By the end of this article, administrators, consultants, and compliance officers will be equipped to design and implement a tailored auditing strategy that meets their organization's unique security and governance needs.
Table of Contents
Chapter 1: Foundational Methods for Basic Login Tracking
Every comprehensive auditing strategy begins with the fundamentals: knowing who is accessing the system and when. Business Central, in conjunction with the broader Microsoft platform, provides two primary methods for this foundational layer of tracking. These methods present a classic trade-off between contextual information within the application and the precise, authoritative data from the identity platform. Mastering both is the first step toward true visibility.
Method 1: The 'Register Time' Feature for Session Duration
The Register Time feature is a native, straightforward tool within Business Central designed to record the amount of time a user spends logged into a specific company. It is the simplest method for getting a general sense of user engagement and system usage over time.
What It Is and How It Works
When enabled, Register Time starts a clock when a user logs in and stops it when they log out. The system then creates an entry recording the user ID, the date, and the total session duration in minutes. This data is valuable for administrators who need to monitor general user activity, manage workloads, or conduct basic system access reviews for audits.
A critical point to understand is that the log entry is only created upon a successful, clean logout. This means that sessions terminated unexpectedly—due to an idle session timeout, a client crash, or a terminal server interruption—are not recorded. This makes the feature useful for tracking intended work periods but unreliable for capturing every single access event.
How to Set User Login History in Business Central
Enabling Register Time is a two-step process that must be configured to begin capturing data:
- Enable the Global Setting:
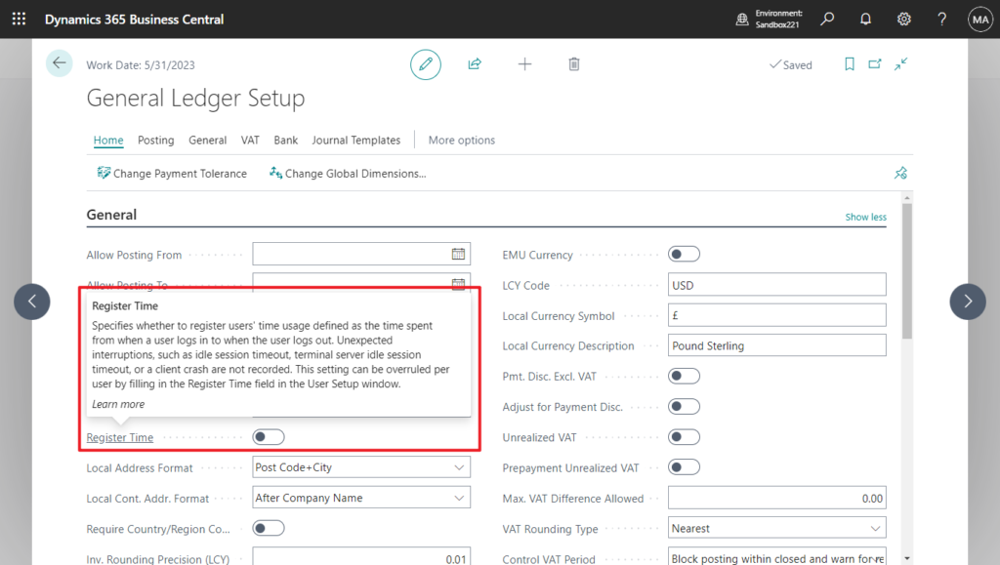
- Use the search icon in Business Central to navigate to the General Ledger Setup page.
- On the General FastTab, locate the Register Time toggle and switch it on. This activates the feature for the entire system, though it can be overridden on a per-user basis.
- When enabled, this global switch tells Business Central to start measuring login-to-logout time for users. If disabled, no session times will be recorded at all. The description states: “Specifies whether to register users’ time usage defined as the time spent from when a user logs in to when the user logs out…”.
- Enable for Specific Users:
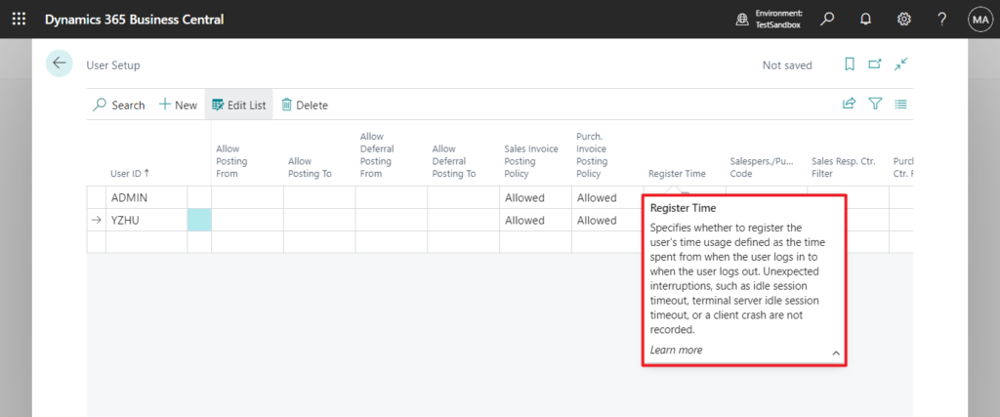
- Navigate to the User Setup page.
- For each user whose activity needs to be tracked, ensure the Register Time checkbox is selected. This allows for granular control, letting administrators track only a subset of users if desired.
Viewing the Data
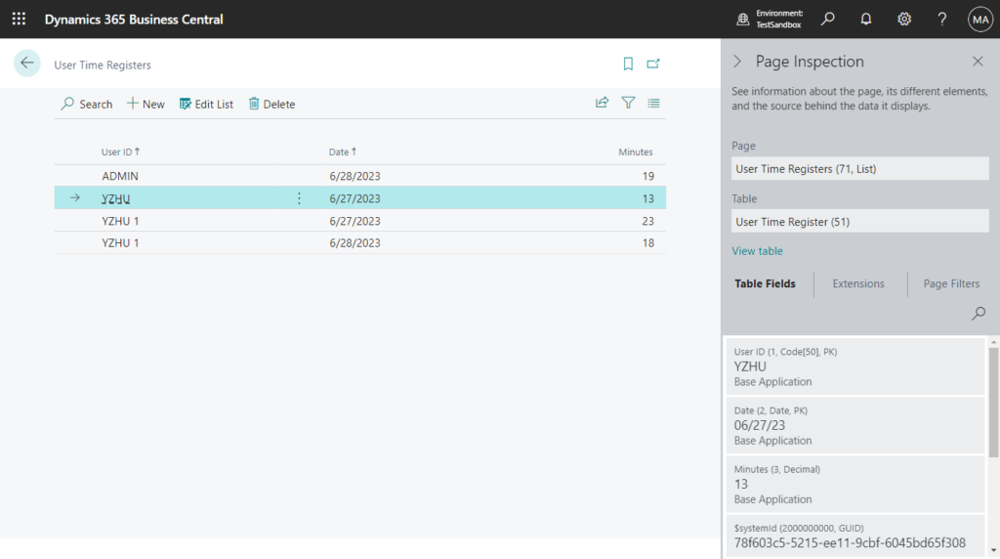
Once configured, the collected data can be viewed on the User Time Registers page. This page provides a simple list of all recorded sessions, showing the user, date, and duration.
- Record when users log out. When a user logs out of Business Central, the system creates a record of that session’s length. (This means session entries appear only after logout, not immediately at login.)
- View the recorded times. To see all recorded login times, open the User Time Registers page. One way is to use the Search (Tell Me) box and type User Time Registers. On that list page, you’ll see columns for User ID, Date, and Minutes (the duration in minutes the user was logged in that day). Each row shows one user’s total logged-in time for a date. This lets you report on or audit how much time users spent in Business Central each day.
Advantages and Limitations
- Advantage: Its primary benefit is simplicity. It is an out-of-the-box feature that is easy to enable and provides a quick overview of user session lengths within the context of a specific Business Central company.
- Limitation: The most significant drawback is its lack of precision. It records the total duration of a session on a given day, not the exact login and logout timestamps. For example, it will show that a user was logged in for 240 minutes on a Tuesday, but it will not show whether they logged in at 8:00 AM or 1:00 PM.
Method 2: Azure Active Directory (Azure AD) Sign-in Logs for Precise Timestamps
For a more detailed user login history in business central (including timestamps and success/failure status), use the Azure Active Directory sign-in logs. Every time a user signs into Business Central (or any Microsoft 365 app), Azure AD records an event. These logs include useful details like the user account, application name, status, IP address, and more. As Microsoft notes, the Azure AD sign-in logs are a “powerful type of activity log that IT administrators can analyze”.
What It Is and How It Works
The Azure AD Sign-in logs capture a wealth of information about every sign-in event, including the user, the exact date and time, the IP address, location, the application being accessed, and whether the attempt was a success or failure. This is an incredibly powerful activity log that serves as the foundation for security and forensic investigations across the entire Microsoft 365 ecosystem.
To access these logs, an administrator must have one of the following roles assigned in Azure: Global Administrator, Security Administrator, Security Reader, Global Reader, or Reports Reader.
How to Access the Logs
To access them:
- Confirm you have permissions. You must be a tenant admin or have one of the required Azure AD roles to view sign-in logs. Specifically, you need to be one of: Global Administrator, Security Administrator, Security Reader, Global Reader, or Reports Reader. Typically, a Global Admin or Reports Reader role is used for these reports.
- Sign in to the Azure portal. Go to https://portal.azure.com and sign in with your admin account. Once logged in, search for or select Azure Active Directory from the menu.
- Open the Sign-in logs. In Azure AD’s navigation, under Monitoring, click Sign-in logs. This brings up a table of recent sign-in events for all applications in your tenant.
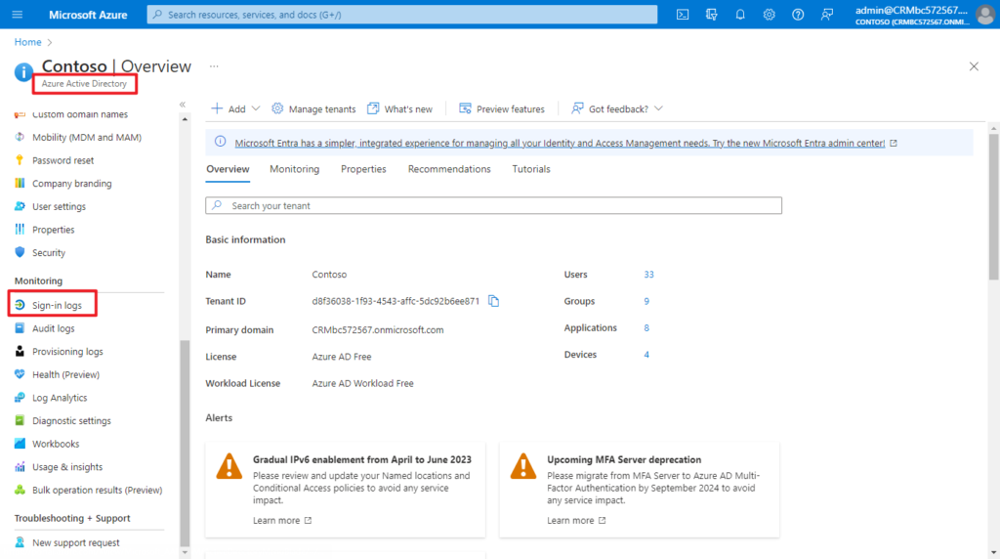
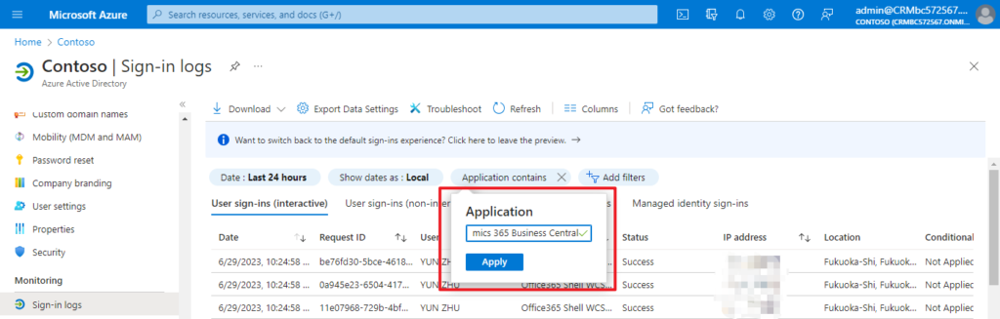
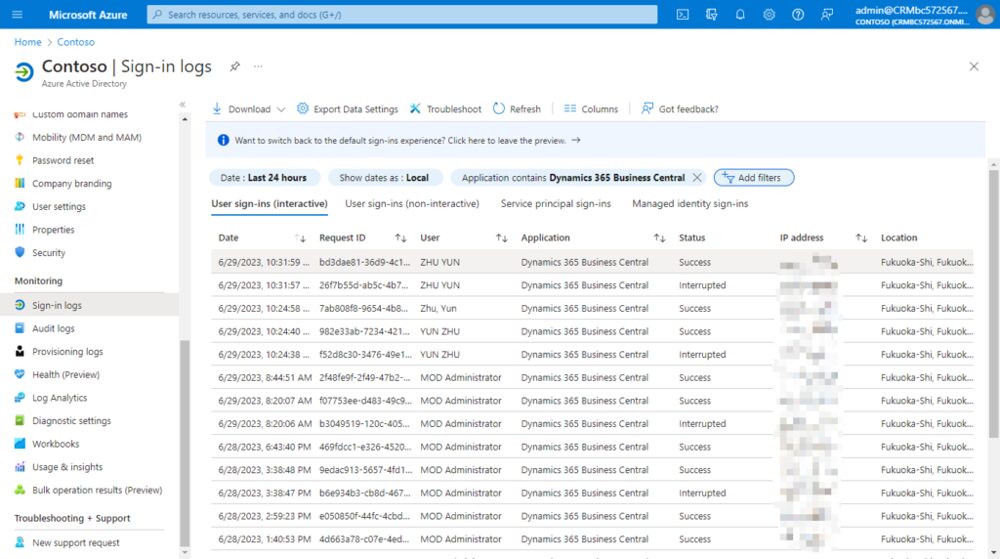
- Filter for Business Central. The sign-in logs show thousands of entries, so filter them to see only Business Central activity. Click Add filters, and add the filter Application contains “Business Central”. This ensures only logins to the Business Central service are shown. The screenshots below illustrate filtering for the Dynamics 365 Business Central app. After applying the filter, you’ll see a list of events where the Application column is “Dynamics 365 Business Central” (or similar). Each line will show the date/time, User, Status (Success or Interrupted), IP, and location.
- Customize columns (optional). You can adjust which columns are visible. Click Columns at the top of the table, then check or uncheck fields (like Username, Client app, IP address, Location, etc.) to tailor the report to your needs. This way you can include information like device or browser if desired.
Advantages and Limitations
- Advantage: The Azure AD Sign-in logs provide unparalleled precision and detail about the authentication event itself. They are the only reliable way to get the exact timestamp of a user's login attempt.
- Limitation: The primary drawback is a lack of Business Central-specific context. While the log shows that a user successfully authenticated to the "Dynamics 365 Business Central" application, it cannot distinguish which specific environment (e.g., Production vs. Sandbox) the user accessed.
This dichotomy between the two foundational methods creates a classic "granularity vs. context" challenge. The Register Time feature operates inside Business Central and knows the company context but lacks timestamp precision. The Azure AD Sign-in logs provide timestamp precision but lack the specific environment context. Neither tool, on its own, can definitively answer the question, "Did User A log into the Production environment at 9:05 AM?"
To answer this, an administrator must perform a two-step correlation. First, they would check the Azure AD Sign-in logs for a successful authentication by User A to the Business Central application around 9:05 AM. Second, they would check the User Time Registers in the Production environment to see if a session was recorded for User A on that day. By combining these two data points, a much more complete and reliable picture of user activity can be constructed. This manual cross-referencing is the first step in building a more sophisticated auditing process.
My Sign-Ins (user-level). Any user can review their own recent sign-in activity by visiting https://mysignins.microsoft.com while logged in. This personal Microsoft 365 page shows all of that user’s login events across Microsoft services. It’s a quick way for an end user to see their own sign-in history, including Business Central logins.
Chapter 2: Advanced Auditing - From Logins to In-System Actions
Once foundational login tracking is established, the next layer of a mature auditing strategy focuses on what users do after they log in. This involves monitoring changes to critical data and observing real-time user sessions. The tools in this chapter represent a significant shift from passive, historical record-keeping to active governance and troubleshooting. They are not merely logs to be reviewed after an incident; they are part of an administrator's active toolkit for maintaining system health, ensuring data integrity, and intervening when necessary.
Method 3: The Change Log for Granular Data Auditing
The Change Log is Business Central's primary native tool for answering the critical question: "Who changed what data, and when?". It provides a detailed, chronological history of direct modifications made by users to the data in the database, making it an indispensable feature for data forensics, error tracing, and accountability.
What It Is and How It Works
The Change Log allows administrators to specify which tables and fields the system should monitor. Once activated, any insertion, modification, or deletion of data in those tracked fields is recorded in the Change Log Entries table. Each entry captures the user ID, the date and time of the change, the type of change (Insert, Modify, Delete), and both the old and new values of the field.
However, this power comes with a significant caveat: tracking changes can negatively affect system performance and dramatically increase the database size. Therefore, its implementation must be strategic and deliberate.
How to Set It Up and Best Practices
- Activate the Change Log:
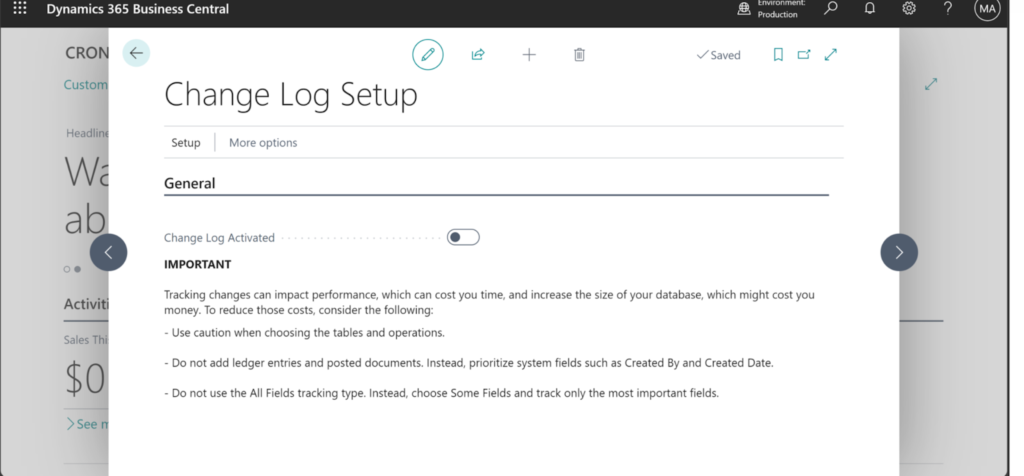
- Search for and open the Change Log Setup page.
- To begin, select the Change Log Activated checkbox. This action is itself logged, so there is always a record of who enabled or disabled the feature.
- Define What to Track:
- From the Change Log Setup page, choose the Actions menu, then Setup > Tables.
- This opens a list of all tables in the database. Here, for each table, an administrator must decide the level of tracking:
- None: No changes are logged for this table.
- Some Fields: This is the recommended best practice. It allows the selection of specific, critical fields to monitor. For example, on the Vendor table, one might only track changes to the
Name,Address, andBank Account No.fields. - All Fields: This option tracks every field in the table. It should be used with extreme caution, as it can generate an enormous volume of data and severely impact performance, especially on transactional tables.
Best Practices for Change Log Configuration:
- Be Selective: Never enable "All Fields" tracking on high-volume tables like General Ledger Entry or other posted document tables. This will quickly bloat the database and slow down the system. Prioritize master data tables (Customers, Vendors, Items) and setup tables.
- Prioritize Critical Fields: Focus on fields that have significant financial or operational impact, such as bank account numbers, credit limits, pricing information, and key configuration settings.
- Set a Retention Policy: To manage database growth, use the Delete Change Log Entries page to set up a retention policy. This allows for the automatic deletion of log entries older than a specified period (e.g., 180 days or 1 year), ensuring the log remains manageable.
Analyzing Change Log Data
The collected data is viewed on the Change Log Entries page. A crucial detail is that a user's changes are not visible in the log until their session is restarted, which occurs when they sign out and back in, switch companies, or their session expires and is refreshed.
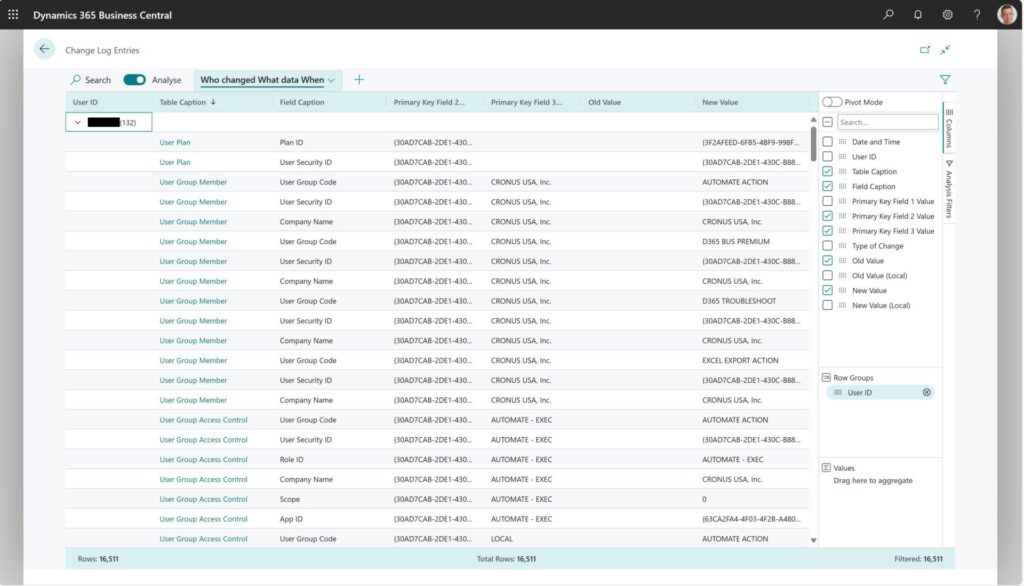
For analysis, Business Central offers a powerful in-page analysis mode. By clicking the "Analyze" icon on the Change Log Entries page, administrators can create pivot-table-like views directly within the client, without needing to export to Excel. A common and highly effective analysis view can be created with the following steps:
- Enter analysis mode and remove all default columns.
- Drag the User ID field to the Row Groups area.
- Add the following fields as columns: Date and Time, Table Caption, Field Caption, Type of Change, Old Value, and New Value.
- This creates a clear, grouped view that instantly answers "Who changed what data, and when?".
Method 4: Monitoring Live User Sessions
While the Change Log provides a historical record, there are times when an administrator needs to know who is in the system right now. This is essential for troubleshooting performance issues, managing licenses, and, in critical situations, terminating a session that may be causing problems, such as a long-running report locking data tables.
Method 4a: The Business Central Admin Center (SaaS)
For organizations using Business Central Online (SaaS), the primary tool for real-time session monitoring is the Business Central Admin Center.
- Access: Only users with specific administrative roles—Global admin, Dynamics 365 Admin, or delegated partner roles like Admin Agent or Helpdesk Agent—can access the Admin Center.
- Functionality:
- Navigate to the Admin Center and select the desired environment.
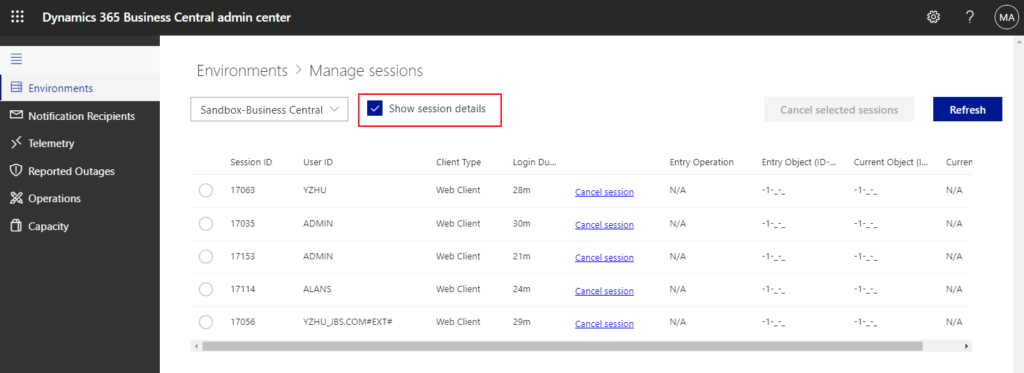
- Choose the Sessions option from the menu.
- The Manage Sessions page will display a list of all active sessions for that environment, including the user ID, login time, and client type (e.g., Web client, API). It's important to note that a single user can have multiple active sessions.
- From this page, an administrator can select one or more sessions and choose Cancel selected sessions. This immediately terminates the user's connection and is a powerful tool for unblocking critical processes.
Method 4b: The 'Active Session' System Table (SaaS and On-Premise)
A more technical method, available for both SaaS and On-Premise deployments, involves directly accessing a system table that stores session information.
- Access: This is done by modifying the Business Central URL to force the client to display the contents of a specific table. The table in question is system table 2000000110 "Active Session".
- Procedure:
- Take the base URL for your Business Central environment.
- Append the parameter
?table=2000000110to the end of the URL. - Example:
https://businesscentral.dynamics.com/your-tenant-id/YourEnvironment?table=2000000110
- Result: This will open a page displaying the raw data from the Active Session table, providing a real-time list of logged-in users similar to what is seen in the Admin Center. This method is particularly useful for On-Premise administrators who do not have access to the SaaS Admin Center or for developers who want to build custom monitoring tools based on this data. For On-Premise environments, the PowerShell command
Get-NAVServerSessionalso provides this information directly from the server instance.

These advanced tools transform the administrator's role from a passive observer to an active guardian of the system. The Change Log provides the forensic evidence needed for accountability, while the ability to monitor and manage live sessions provides the immediate intervention capability required to ensure system stability and availability.
Method 4c: Business Central App Usage reports (Power BI)
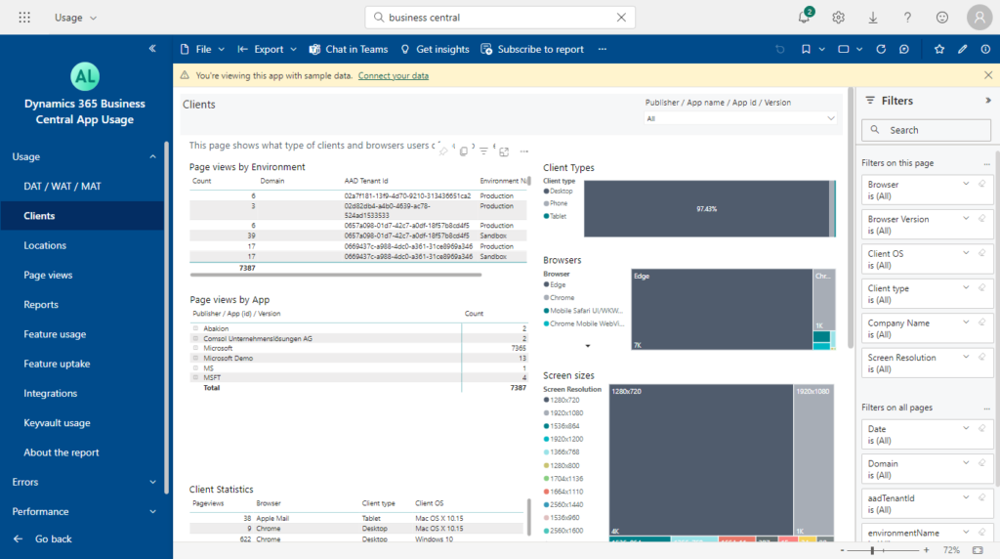
Business Central App Usage reports (Power BI). Microsoft offers a Dynamics 365 Business Central App Usage Analytics template app for Power BI. This app connects to your Business Central telemetry (via Azure Application Insights) and provides dashboards on user activity, page views, and system performance.
While it does not include a dedicated login history report, it gives rich insights into how users interact with the system (which pages they use, how often, error rates, etc.). You can install it from AppSource by searching for Business Central App Usage Analytics. The example below shows part of the Clients dashboard in that report, illustrating usage by browser and environment.
Chapter 3: At a Glance - A Comparative Analysis of Tracking Methods
Choosing the right tool for a specific auditing task can be challenging given the variety of options available in Dynamics 365 Business Central. Each method has a distinct purpose, level of complexity, and impact on the system. The following table provides a comparative analysis to help administrators, consultants, and compliance officers make informed decisions based on their specific needs. This framework distills the key characteristics of each primary tracking method, transforming a list of features into a practical decision-making guide.
| Feature | Register Time | Azure AD Sign-in Logs | Change Log | Active Session Monitoring |
|---|---|---|---|---|
| Primary Use Case | Basic reporting on user session duration for workload analysis. | Authoritative tracking of precise login timestamps for security and forensic investigation. | Detailed auditing of data modifications to answer "who changed what, and when." | Real-time troubleshooting and monitoring of currently logged-in users. |
| Information Tracked | User ID, Date, Session Duration (in minutes). | User, Exact Timestamp, IP Address, Location, Application, Success/Failure. | User, Timestamp, Table, Field, Type of Change, Old Value, New Value. | User ID, Login Datetime, Client Type, Session ID. |
| Granularity | Low. Provides only total duration for a day, not specific login/logout times. | High. Provides precise, to-the-second timestamps for every authentication attempt. | Very High. Tracks changes at the individual field level for specified tables. | Real-Time. Shows a snapshot of active sessions at the current moment. |
| Setup Complexity | Low. Requires toggling settings in General Ledger Setup and User Setup. | Low. Enabled by default in Azure AD. Requires appropriate admin roles to view. | Medium. Requires careful planning to select tables/fields and configure retention policies. | Low. Accessible via the Admin Center or a URL modification. No setup required. |
| Performance Impact | Negligible. | None on Business Central. It's an external Azure service. | High. Can significantly impact performance and database size if not configured selectively. | Low. Viewing sessions has minimal impact. |
| Key Advantage | Simple, out-of-the-box feature providing session data within the BC company context. | The single source of truth for authentication events across all Microsoft 365 services. | Provides a complete, legally defensible audit trail of data changes within the system. | Allows for immediate intervention, such as canceling a problematic session to unblock users. |
| Key Limitation | Does not record exact login times and misses sessions terminated unexpectedly. | Cannot determine which specific BC environment (Production/Sandbox) was accessed. | Can cause significant performance degradation and database bloat if used improperly. | Provides only a momentary snapshot; does not maintain a historical log of sessions. |
Chapter 4: Enterprise-Grade Monitoring & Unified Compliance
As organizations grow and their reliance on Business Central deepens, the need for auditing transcends simple logging and enters the realm of enterprise-grade monitoring and governance. This requires tools that can provide a holistic view of system health and integrate ERP data into a broader corporate compliance framework.
The introduction of Telemetry and the Microsoft Purview integration represents a fundamental paradigm shift. Business Central is no longer managed as a self-contained application island. Instead, it is treated as a critical cloud service whose performance must be continuously monitored and as a vital data source within a larger corporate data estate subject to unified governance rules. Mastering these advanced capabilities requires administrators to adopt new skills and a broader perspective, viewing the ERP system as a component of the overall IT and compliance strategy.
Method 5: Holistic Monitoring with Telemetry & Application Insights
Telemetry in Business Central is a game-changing feature for IT teams, providing a clear, detailed picture of the environment's operational health. It moves beyond simple user tracking to offer a comprehensive monitoring solution that records a vast array of activities, including logins, user security changes, data processing, performance metrics, and user errors.
What It Is and How It Works
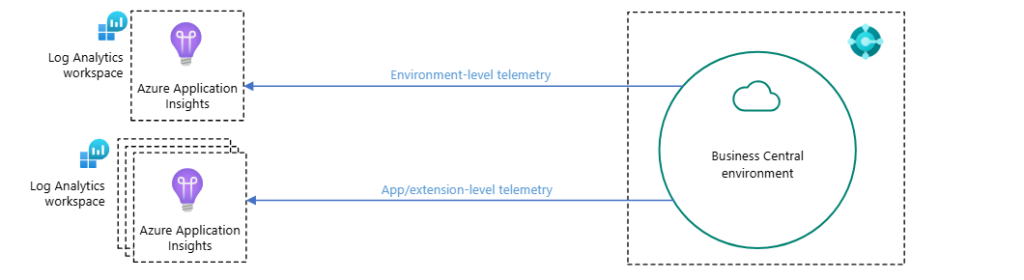
Business Central can be configured to emit a continuous stream of telemetry data to a designated Azure Application Insights resource. Application Insights is a powerful Azure service designed for application performance management (APM). Once the data is in Application Insights, it can be queried, analyzed, and visualized using the Kusto Query Language (KQL) or through pre-built Power BI reports.
The scope of data captured by Telemetry is extensive and includes:
- Success and failure rates of sign-in attempts.
- User onboarding and permission activities.
- Database blocks and lock time-outs.
- The number of page views and which pages are being accessed.
- Execution times for reports, queries, and web service requests.
- Any error messages that users encounter, along with their full context.
A significant benefit of Telemetry is its ability to enable proactive troubleshooting. IT teams no longer need to rely on incomplete or inaccurate error reports from end-users. The system records the exact error message and the context in which it occurred, allowing for faster diagnosis and resolution.
You Can read more about Monitoring and Analyzing Telemetry and Business Central Microsoft Guide.
Key Considerations
While immensely powerful, implementing Telemetry requires careful management. The volume of data generated can be substantial, which can lead to significant Azure consumption costs if not properly managed. Administrators should be mindful of the data they are collecting and can use features like transformation rules in Azure Monitor to filter or sample data to control costs.
Method 6: Centralized Auditing with Microsoft Purview Integration
The most recent and powerful addition to the Business Central auditing toolkit is the integration with Microsoft Purview. Announced in the 2024 Wave 1 release, this feature elevates auditing from an application-specific task to an enterprise-wide compliance function.
What It Is and How It Works
Microsoft Purview is a comprehensive suite of solutions for data governance, protection, and compliance across an organization's entire data estate. The integration means that auditable events occurring in Business Central environments are now automatically emitted to the Microsoft Purview unified audit log.
The paramount benefit of this integration is the creation of a single, centralized platform for auditing. Security and compliance teams can now monitor events from Business Central alongside events from other Microsoft services like SharePoint, Exchange, Teams, and Power BI. This unified view is essential for conducting effective security investigations, responding to forensic requests, and meeting complex compliance obligations like GDPR or HIPAA.
What is Logged and How to Access It
Microsoft Purview Audit (Standard) is enabled by default for most Microsoft 365 and Office 365 enterprise organizations. This includes a default audit log retention period of 180 days. Accessing the audit log requires specific roles, such as Audit Manager or Audit Reader, which can be assigned in the Purview compliance portal.
The integration specifically captures high-privilege administrative activities performed in Business Central. These events can be found in the audit log under the Dynamics365BusinessCentralLog record type. Examples of logged activities include:
- Environment Administration: Creating, deleting, renaming, copying, or restoring an environment.
- Security Management: Setting or removing security group access to an environment.
- Session Management: Canceling a user session from the Admin Center.
- Configuration Changes: Setting the Application Insights connection string or changing the update window.
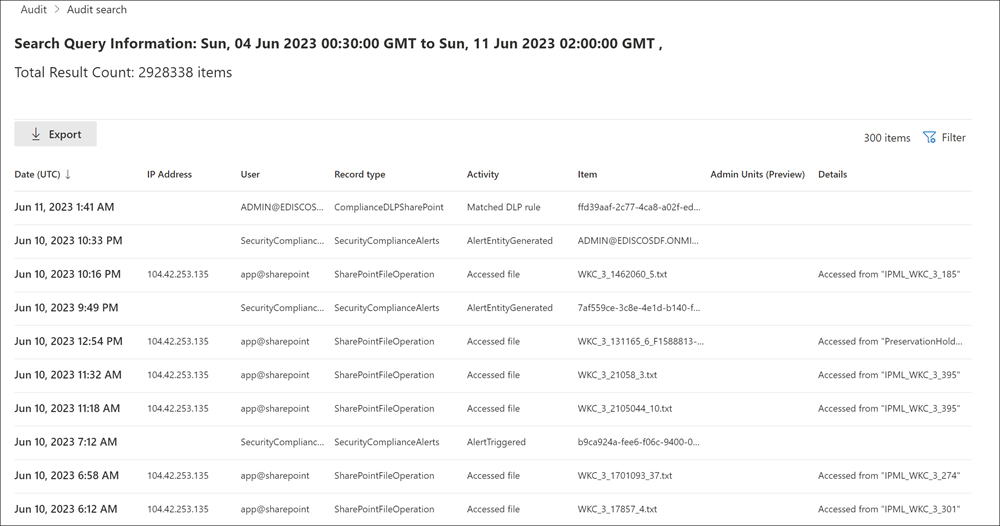
To search the logs, an administrator navigates to the Audit solution within the Microsoft Purview portal, where they can build queries based on date ranges, users, and specific activities or workloads, including "Dynamics 365 Business Central". The results can be viewed in the portal or exported to a CSV file for further analysis.
This integration fundamentally changes the nature of Business Central auditing. The conversation is no longer limited to "Who changed a vendor record?" Now, it addresses far more critical, enterprise-level questions like, "Can we produce a legally defensible audit trail of all administrative actions performed on our financial system during a specific period for a forensic investigation?" By connecting Business Central to Purview, Microsoft has provided the tool to answer that question with confidence.
You Can read more about Microsoft Purview auditing solutions for Business Central!
Chapter 5: Proactive Security - Configuring Real-Time Alerts
A truly effective security posture is not just reactive; it is proactive. While logging user activity for later review is essential, the ability to receive immediate notifications when high-risk events occur can be the difference between a minor data correction and a major security incident. Business Central provides powerful features to move from passive logging to active, real-time alerting. The Field Monitoring feature, in particular, serves as the critical bridge between the comprehensive, data-level auditing of the Change Log and the business's need for immediate risk mitigation. It filters the "noise" of routine data changes and elevates specific, high-risk modifications into an actionable alert sent directly to a responsible individual.
Alerts on Critical Data Changes with Field Monitoring
Field Monitoring is an out-of-the-box feature that builds upon the Change Log functionality to provide real-time email alerts when the values in specific, sensitive data fields are modified. This is invaluable for preventing unauthorized changes to critical information, such as vendor bank account details, customer credit limits, or company banking information, thereby helping to prevent fraud and ensure data integrity.
How to Set Up Field Monitoring Alerts
Configuring these alerts is a straightforward process managed through an assisted setup guide:
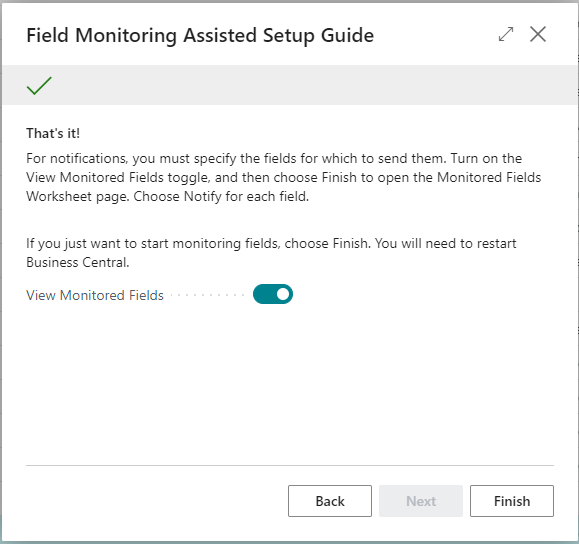
- Launch the Setup Wizard: Use the search function in Business Central to find and open Field Monitoring Setup. This will launch the assisted setup guide.
- Configure Notifications:
- In the wizard, specify the user who should receive the alert emails in the Notification Recipient field.
- Select the email account that will be used to send the notifications in the Notification Email Account field. It is crucial that email accounts have been properly configured within Business Central for this to function.
- Click Start to begin the monitoring service. Business Central will display a warning, advising that the feature be used conservatively, as excessive monitoring can flood an inbox and potentially impact system performance.
- User Re-Login Required: After activation, all users who are currently logged into Business Central must sign out and sign back in for the monitoring to take effect for their sessions.
- Select Fields to Monitor:
- Once the service is started, navigate to the Monitored Fields Worksheet.
- In the worksheet, add new lines for each field to be monitored. This is done by specifying the Table Number and the Field Number.
- For each field, check the Notify box. This is the critical step that enables the email alert for that specific field. For example, to monitor changes to vendor bank accounts, an administrator would add entries for the
Bank Account No.andTransit No.fields in theVendor Bank Accounttable.

The Anatomy of a Field Monitoring Alert
When a change is made to a monitored field, the designated recipient receives a detailed email notification. This email is highly actionable and contains three important parts:
- A direct link to the Monitored Field Log Entries, allowing for quick access to the relevant log.
- Details of the change itself, including the original value, the new value, the user who made the change, and the timestamp.
- A link to the user's Effective Permissions, enabling an administrator to immediately review and, if necessary, modify that user's access rights to prevent further changes.
Custom In-App and Email Notifications
Beyond the out-of-the-box Field Monitoring, Business Central's extensibility allows for the creation of highly customized alert systems to meet unique business requirements.
- Custom In-App Notifications: For developers, Business Central's AL programming language provides a framework for creating custom, non-modal notifications that appear in the user interface. These are less intrusive than pop-up messages and can inform users of specific situations without blocking their work. For example, a notification could appear on a sales order if the selected customer has exceeded their credit limit, providing an immediate, context-sensitive warning. These notifications can also include actions, allowing a user to click a button within the notification to navigate to another page or trigger a process.
- Targeted Email Notifications: Business Central also includes standard functionality for sending targeted email notifications as part of a business workflow. By setting up User Groups, administrators can group individuals with shared responsibilities (e.g., "Accounts Payable Team"). Then, using standard codeunits for email, custom processes can be built to send email alerts to all members of a specific group when a certain event occurs. This is a powerful way to ensure that the right team is notified about events relevant to their function without needing to alert a single, generic administrator.
By combining the targeted, high-risk alerts of Field Monitoring with the potential for custom-developed notifications, organizations can build a robust, proactive security framework that keeps key stakeholders informed and empowers them to act swiftly when it matters most.
Chapter 6: Best Practices for an Optimized Auditing Strategy
Implementing a comprehensive auditing and monitoring strategy in Dynamics 365 Business Central is not a "set it and forget it" task. A poorly configured strategy can lead to significant system performance degradation, bloated databases, and overwhelming "alert fatigue." To derive maximum value from these powerful tools while minimizing their negative impact, it is essential to follow a set of strategic best practices.
- Be Selective with the Change Log: The Change Log is powerful but resource-intensive. Its use must be surgical.
- Always prefer "Some Fields" over "All Fields" when configuring tracking for a table. Tracking all fields, especially on wide tables, generates excessive data.
- Avoid tracking high-volume transactional tables, such as ledger entries and posted documents. The sheer volume of data will quickly overwhelm the system. Instead, rely on the inherent system fields like
Created ByandCreated Dateon these records for basic audit information. - Prioritize master data and setup tables, where changes are less frequent but have a higher impact.
- Implement Strategic Filtering: This principle applies to all auditing tools. Fine-tune your settings to focus only on critical data and events. The goal is to separate the signal from the noise. For Field Monitoring, only track fields that represent a genuine business risk if changed. For Telemetry, consider using Azure Monitor transformation rules to filter out low-value events before they are ingested, thereby controlling costs.
- Establish Scheduled Maintenance and Retention Policies: Audit logs grow indefinitely unless they are managed.
- For the Change Log, use the Delete Change Log Entries page to configure a retention policy that automatically purges old records (e.g., after 180 or 365 days). This prevents database bloat and maintains system performance.
- For Azure AD and Microsoft Purview, be aware of the default retention periods (e.g., 30-90 days for Azure AD, 180 days for Purview Standard) and purchase premium licenses if longer retention is required for compliance.
- Continuously Monitor Performance: Activating auditing is not a one-time event. Administrators must monitor system performance to understand the impact of their tracking configuration.
- Use Telemetry to identify potential bottlenecks or resource constraints related to your audit operations. If you see a spike in database write times after enabling the Change Log on a new table, you may need to reconsider that choice.
- Proactively address performance issues to maintain an optimal user experience.
- Manage Telemetry Costs: The comprehensive data provided by Telemetry comes at a price. Unmanaged telemetry can lead to unexpectedly high Azure bills. Regularly review your Azure Application Insights usage and costs. Implement sampling or filtering if the data volume becomes a concern.
- Enforce the Principle of Least Privilege: Access to audit logs is sensitive. Ensure that only appropriate personnel have the rights to view and manage these logs.
- Use the built-in roles in Azure AD (e.g., Security Reader) and Microsoft Purview (e.g., Audit Reader) to grant read-only access to compliance or investigation teams.
- Limit the number of users with highly privileged roles like Global Administrator or Audit Manager.
By adhering to these best practices, organizations can build an auditing framework that is not only powerful and comprehensive but also sustainable, cost-effective, and performance-friendly.
Frequently Asked Questions
This section provides direct answers to some of the most common and specific questions administrators and users have about tracking activity in Dynamics 365 Business Central.
How do I export user session data from Business Central?
You can export the User Time Registers list to Excel by clicking the Actions → Send to Excel button on that page. This creates a .xlsx file with all recorded days and minutes per user, which you can then filter or chart externally.
Can I change how long Business Central keeps Register Time entries?
Yes. By default, Business Central retains session records indefinitely, but you can configure data retention policies in Data Management under Administration → Data Retention. Set up a cleanup job to delete User Time Registers entries older than a specified number of months.
Does tracking user activity slow down Business Central?
Yes, certain tracking features can impact system performance. The Change Log has the most significant potential impact, as every database modification on a tracked field results in an additional write operation to the log table. This is why selective tracking is critical. Extensive Telemetry can also add a minor overhead to operations, although it is highly optimized. Features like Register Time and viewing Active Sessions have a negligible impact on performance.
How can I view login history on the Business Central mobile app?
The User Time Registers page and Azure AD sign-in logs are only accessible via the web client or Azure portal. For mobile insights, consider embedding a Power BI report (using the App Usage Analytics template) into a Business Central Role Center that you can open on mobile.
Is there a way to get email alerts for failed Business Central logins?
Yes—use Azure AD’s Sign-in risk policy under Security → Conditional Access to trigger an alert or require multifactor authentication on suspicious or failed sign-in attempts to Business Central.
How do I exclude service accounts from session tracking?
In User Setup, simply uncheck the Register Time field for any service or integration user. Those users’ sessions won’t be recorded, keeping your reports focused on interactive end-user activity.
Are my login logs GDPR-compliant?
Business Central and Azure AD both allow you to anonymize or purge user-identifiable data. Combine data-retention policies with role-based access controls so that only authorized staff (e.g., Compliance Officer) can view raw login timestamps or IP address details.
How can I see who is logged into Business Central right now?
There are two primary methods for viewing active user sessions in real-time. For SaaS users, the most straightforward way is through the Business Central Admin Center. Navigate to the specific environment, select Sessions, and the Manage Sessions page will display all currently active users. From here, you can also cancel sessions if needed. For both SaaS and On-Premise users, a more technical method is to directly view system table 2000000110 "Active Session" by appending ?table=2000000110 to your Business Central URL.
Can I track if a user has ever logged in to a specific environment?
Yes, this is possible, though the standard user interface does not expose this information directly. For developers or technical administrators, there is a standard function within codeunit 9026 "User Login Time Tracker" that can determine if a user has ever logged into the current environment. This method checks an internal table (table 9011 "User Environment Login") that records a user's first login to an environment. This is particularly useful for license management, as it helps identify users who have been assigned a license but have never accessed the system.
What is the difference between the Change Log and Field Monitoring?
While related, they serve different purposes. The Change Log is a comprehensive, reactive auditing tool designed to record a broad history of data modifications for forensic analysis and compliance. You configure it to track many fields and review the logs later.
Field Monitoring is a proactive, targeted alerting tool. You select a small number of high-risk fields (like a bank account number), and the system sends an immediate email notification to a specific person the moment that field's value is changed. Think of it as an early warning system built on top of the Change Log's data collection engine.
Is Microsoft Purview included with my Business Central license?
The integration itself is a feature of Business Central, but the ability to use Microsoft Purview depends on your organization's Microsoft 365 licensing. Microsoft Purview Audit (Standard), which includes a 180-day log retention, is enabled by default for most Microsoft 365 and Office 365 enterprise subscriptions. However, premium features, such as longer retention policies (up to 10 years) or intelligent insights, require Audit (Premium) licenses, which are available as add-ons or are included in higher-tier license suites like E5/G5.
How long are audit logs retained in each system?
Retention periods vary significantly between the different tools:
Change Log: Data is retained indefinitely until it is manually cleared or a retention policy is configured on the Delete Change Log Entries page to purge records older than a specific date.
Azure AD Sign-in Logs: Retention depends on your Azure AD license. It is typically 30 days for P1/P2 licenses and 7 days for the free tier.
Microsoft Purview: The Audit (Standard) license includes a 180-day retention period. With
Audit (Premium) licenses, this can be extended up to 1 year by default, and up to 10 years with specific add-on licenses.
Can I get a single report of all user activities in Business Central?
No, there is no single, out-of-the-box report that consolidates all user activities across all the different logging systems. A comprehensive view of user activity requires a multi-faceted approach. To build a complete picture, an administrator must combine data from multiple sources:
Azure AD Sign-in Logs for authentication, the Change Log for data modifications, Telemetry for operational activity and errors, and Microsoft Purview for administrative actions. This is why understanding each tool's purpose and data is crucial for effective auditing.
Conclusion: Building a Multi-Layered Auditing & Security Framework
Effectively tracking user activity in Dynamics 365 Business Central is not about finding a single, perfect tool. Instead, it is about understanding and implementing a multi-layered strategy, where each layer addresses a specific aspect of security, compliance, and operational oversight. The spectrum of available tools, from simple internal logs to sophisticated enterprise platforms, allows organizations to build a framework tailored to their precise needs.
The layers of this comprehensive strategy can be summarized as follows:
- Layer 1: Foundational Access Logging. This is the baseline, established by combining the in-app context of Register Time with the authoritative, precise timestamps from Azure AD Sign-in Logs. This layer answers the fundamental question of who accessed the system and for how long.
- Layer 2: Data Integrity and Forensics. The Change Log forms this critical layer, providing a detailed, granular, and legally defensible record of all modifications to key data. It is the primary tool for forensic investigations and ensuring data accountability.
- Layer 3: Proactive Risk Mitigation. Field Monitoring elevates the strategy from reactive to proactive. By generating real-time alerts on changes to high-risk fields, it acts as an early warning system, enabling immediate intervention to prevent fraud or correct critical errors.
- Layer 4: Operational Health and Performance Monitoring. Telemetry provides a holistic, 360-degree view of the system's operational health. It moves beyond user actions to encompass performance, errors, and feature usage, allowing IT teams to manage Business Central as a mission-critical cloud service.
- Layer 5: Unified Enterprise Compliance. The integration with Microsoft Purview represents the pinnacle of the auditing framework. It places Business Central activity within the context of the entire corporate data estate, providing a single, unified platform for security and compliance teams to conduct investigations and meet regulatory obligations across all Microsoft services.
Ultimately, the path to a secure and well-governed Business Central environment begins with a thorough assessment of an organization's unique requirements. Whether the primary concern is simple time tracking for user productivity, fraud prevention through the monitoring of financial data, or demonstrating enterprise-wide compliance to auditors, the tools exist. By strategically selecting and combining the methods detailed in this guide, administrators can construct a robust, scalable, and effective auditing framework that protects their organization's most valuable assets and ensures the integrity of their financial system.
Feel Free to ask any question Related To Tracking Login History in Business central at our Community Section!
